This manual will guide you through the process of installing and running the Home Assistant Supervised UTM image on your Mac.
The necessary files can be purchased from the Siytek Shop and are then available to download from the My Account section.
If you experience any difficulties, there are a list of troubleshooting topics towards the end of this document. If you have any problems that cannot be solved by the list of common solutions, please don’t hesitate to contact support: [email protected]
- What is the Home Assistant Supervised For Mac OS UTM Image?
- Downloading the Files
- Installation
- Changing the System Date & Time
- Troubleshooting
- My download link is not working
- Home Assistant Refused to Connect
- I get an error when trying to run the Home Assistant image in UTM
- Unzipping the Download Produced a "__MACOSX" Folder and I am Getting A No Such File or Directory Error
- This Site Can't Provide a Secure Connection Error
- Home Assistant won't Detect My Devices
- Unable to Connect to Home Assistant using the Mobile App or a Browser on a Different Computer
- Bridged Network Mode does Not Give me an IP Address When Using a Wired Network (Ethernet) Connection
- Switching the UTM Network Mode
What is the Home Assistant Supervised For Mac OS UTM Image?
The Home Assistant Supervised For Mac OS UTM Image is a package containing a pre-installed copy of Debian Linux and Home Assistant, along with a copy of UTM.
UTM is a fully featured system emulator and virtual machine host for Mac OS. It allows you to run Windows, Linux, and more on your Mac.
The complete supervised installation of Home Assistant runs on the Debian Linux operating system. Therefore we can use UTM to run a copy of Debian Linux, which we can use to run Home Assistant on.
The process of installing Debian Linux and Home Assistant within UTM can be challenging and time consuming, but none of it is necessary when using the pre-installed Home Assistant Supervised image for Mac.
Simply download the files and launch the included image to start Home Assistant on your Mac.
Downloading the Files
Once you have purchased the Home Assistant Supervised For Mac OS UTM Image from the Siytek Shop, the download will be immediately available.
You can click the download button provided on the invoice that is presented to you immediately after the transaction. A copy of this invoice will be emailed to you, which also contains the download link.
The download is also accessible at any time from the downloads area on your My account page.
In order to access your My account page you will first need to log in. If you have forgotten your password, you can reset it here.
Click the download button in order to download the .zip archive that contains UTM and the Home Assistant Debian Image and save it to a suitable location.
Installation
Installation is straightforward, simply follow these steps:
- Double click the downloaded
.ziparchive to unpack the files. The files will be placed into a new folder of the same name as the.zipfile. - Open the new folder and double-click the
UTM.dmgfile. - A window will open containing the UTM program and a shortcut to your Applications folder. Simply drag the UTM program and drop it onto the Applications folder shortcut in order to install UTM.
- Once UTM has finished copying across to your Applications folder, double click the
Home Assistant Supervised on Debian.utmfile in order to launch Home Assistant. - A window will open and Debian will boot up. Home Assistant will start automatically.
- Once the bootup process has completed, the IP address necessary for connecting to Home Assistant will be reported in the console.
- Open your browser and navigate to
http://<IP-address->:8123, replacing<IP-address>with the one that is provided.
Changing the System Date & Time
The system date and time is usually set during the Debian installation, however as this image comes with Debian pre-installed, the date and time has already been set.
Out of the box the Debian system date and time is set to America/Central. In order to change it to the correct date and time for your region, complete the following steps:
- Log in to Debian using the credentials given in the VM notes (visible in the main UTM window).
- use the following command in Debian to list the time zones (use the spacebar to scroll the page and ctrl + c to exit):
timedatectl list-timezones
- Once you’ve found the time zone that you want to use, you can use the following command to change your system date and time, replacing
<your-timezone>with your desired timezone from the list above:
sudo timedatectl set-timezone <your-timezone>
- You can check that the changes have been made by entering the command
date
Troubleshooting
If you experience any problems, please check if your problem is listed below and can be solved by one of the common solutions. If you are still experiencing problems, please don’t hesitate to contact us: [email protected]
- My download link is not working
- Home Assistant Refused to Connect
- I get an error when trying to run the Home Assistant image in UTM
- Unzipping the Download Produced a "__MACOSX" Folder and I am Getting A No Such File or Directory Error
- This Site Can't Provide a Secure Connection Error
- Home Assistant won't Detect My Devices
- Unable to Connect to Home Assistant using the Mobile App or a Browser on a Different Computer
- Bridged Network Mode does Not Give me an IP Address When Using a Wired Network (Ethernet) Connection
- Bridged network mode and Ethernet
My download link is not working
If you experience any problems downloading the files following a purchase, please contact our support team. In the rare event that our server is experiencing an issue, we can send you an alternative download link.
Home Assistant Refused to Connect
Sometimes your web browser may give you a “refused to connect” error message when you first start the virtual machine. The most common reason for this error is simply that the Home Assistant server has not yet finished loading.
First, wait 1-2 minutes and try again. If you still get the error message after a couple of minutes you can check whether or not Home Assistant is running:
- Login to Debian using the credentials provided (shown on the main UTM screen when the VM is selected).
- Enter the following command and enter the user password when prompted:
sudo docker ps
Next, confirm that all of the Home Assistant containers are running as per the following screenshot:
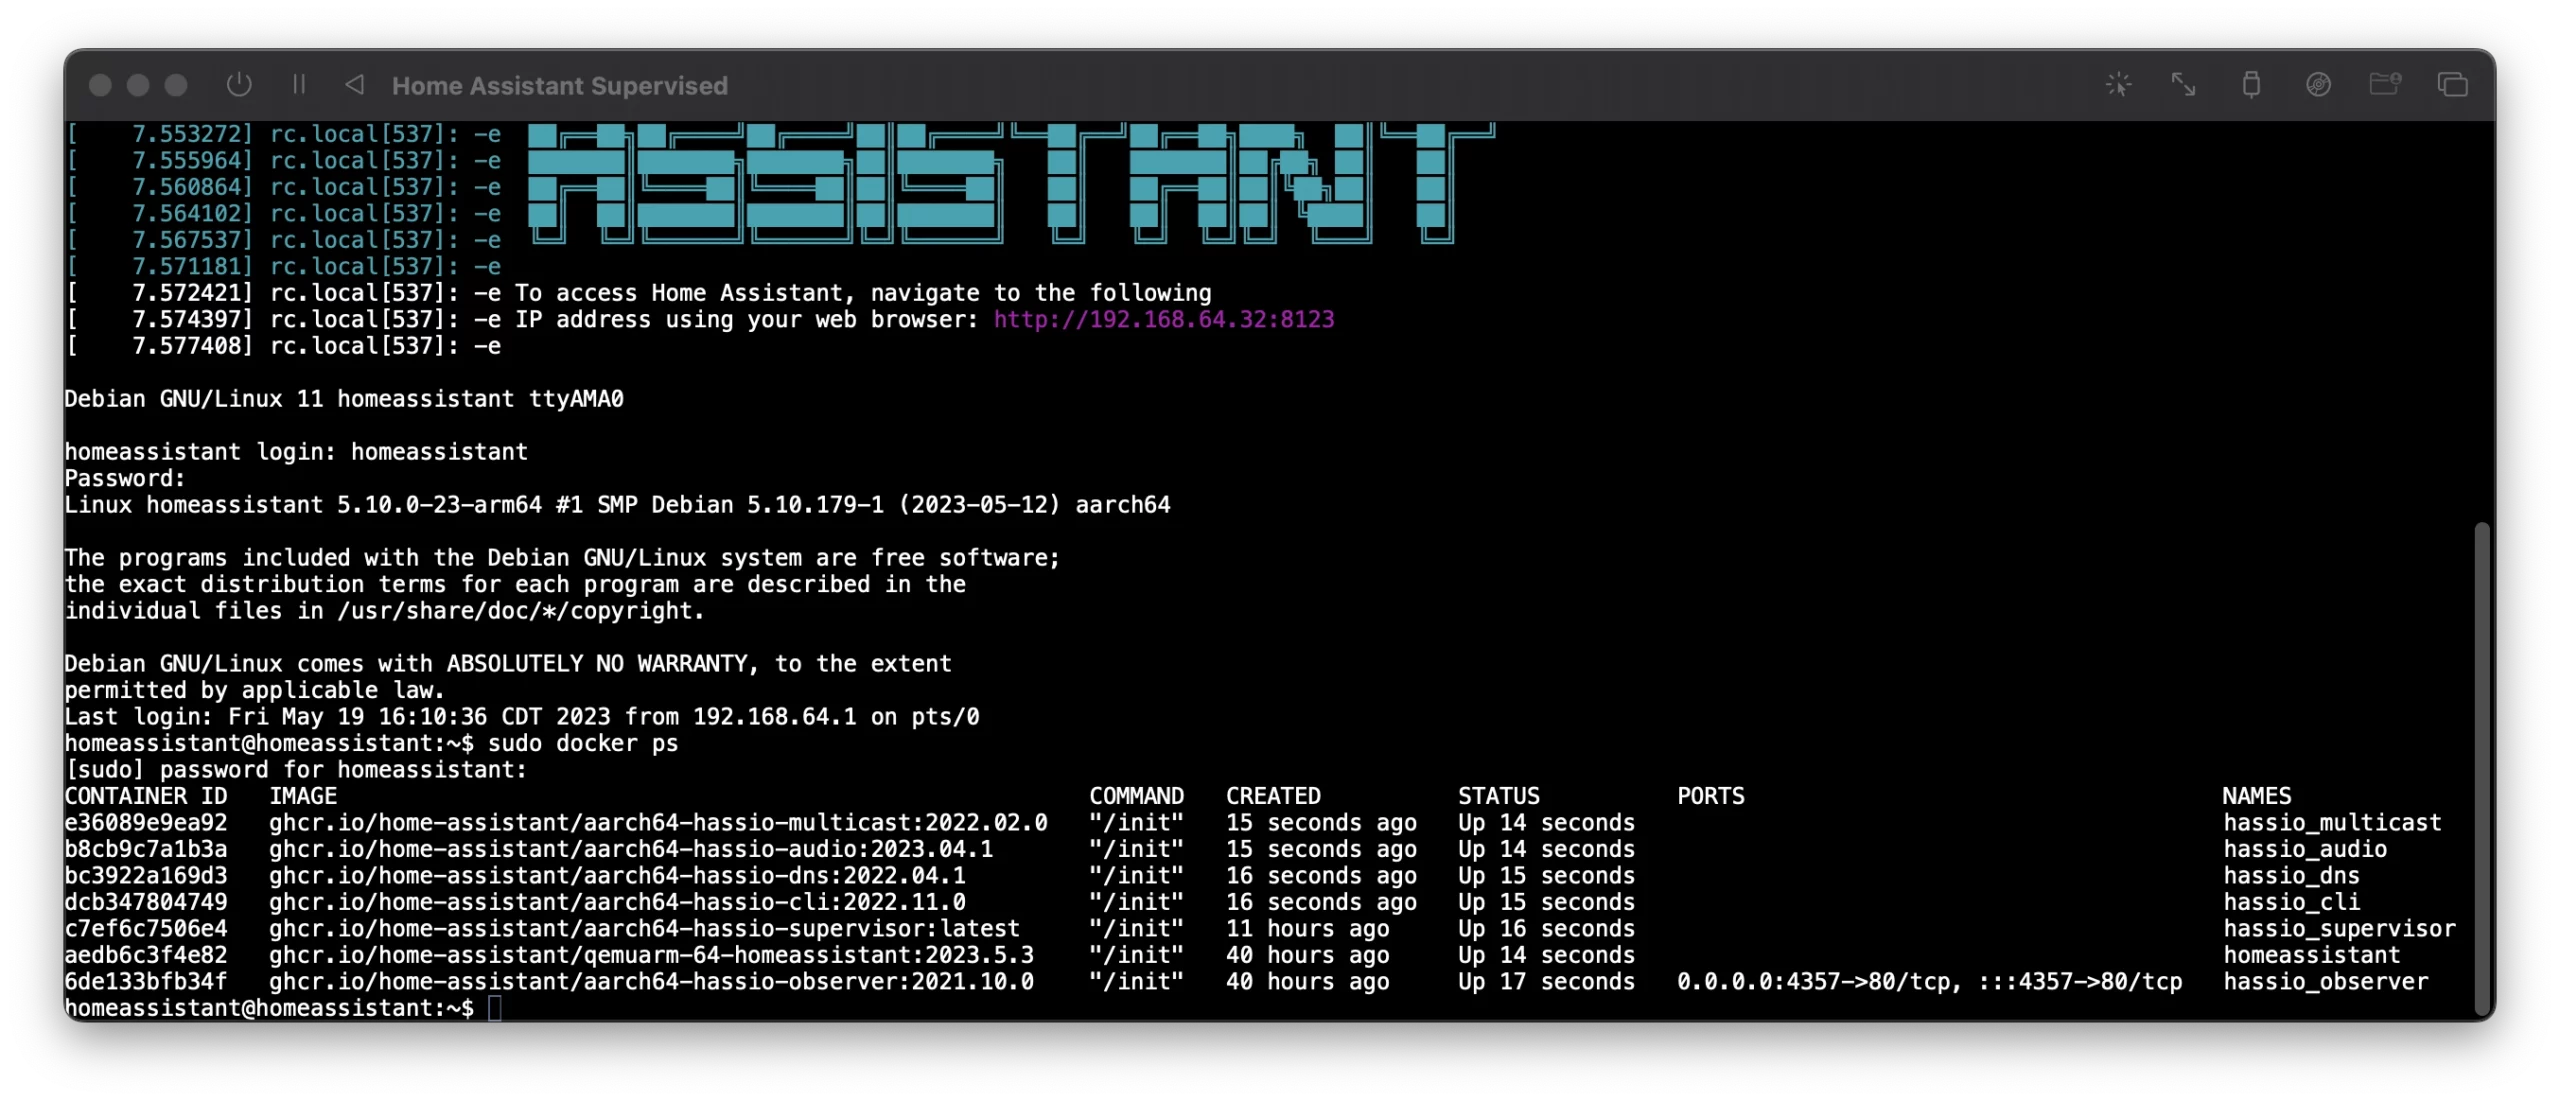
If you are getting a different result, please contact support and attach a screenshot of the output.
I get an error when trying to run the Home Assistant image in UTM
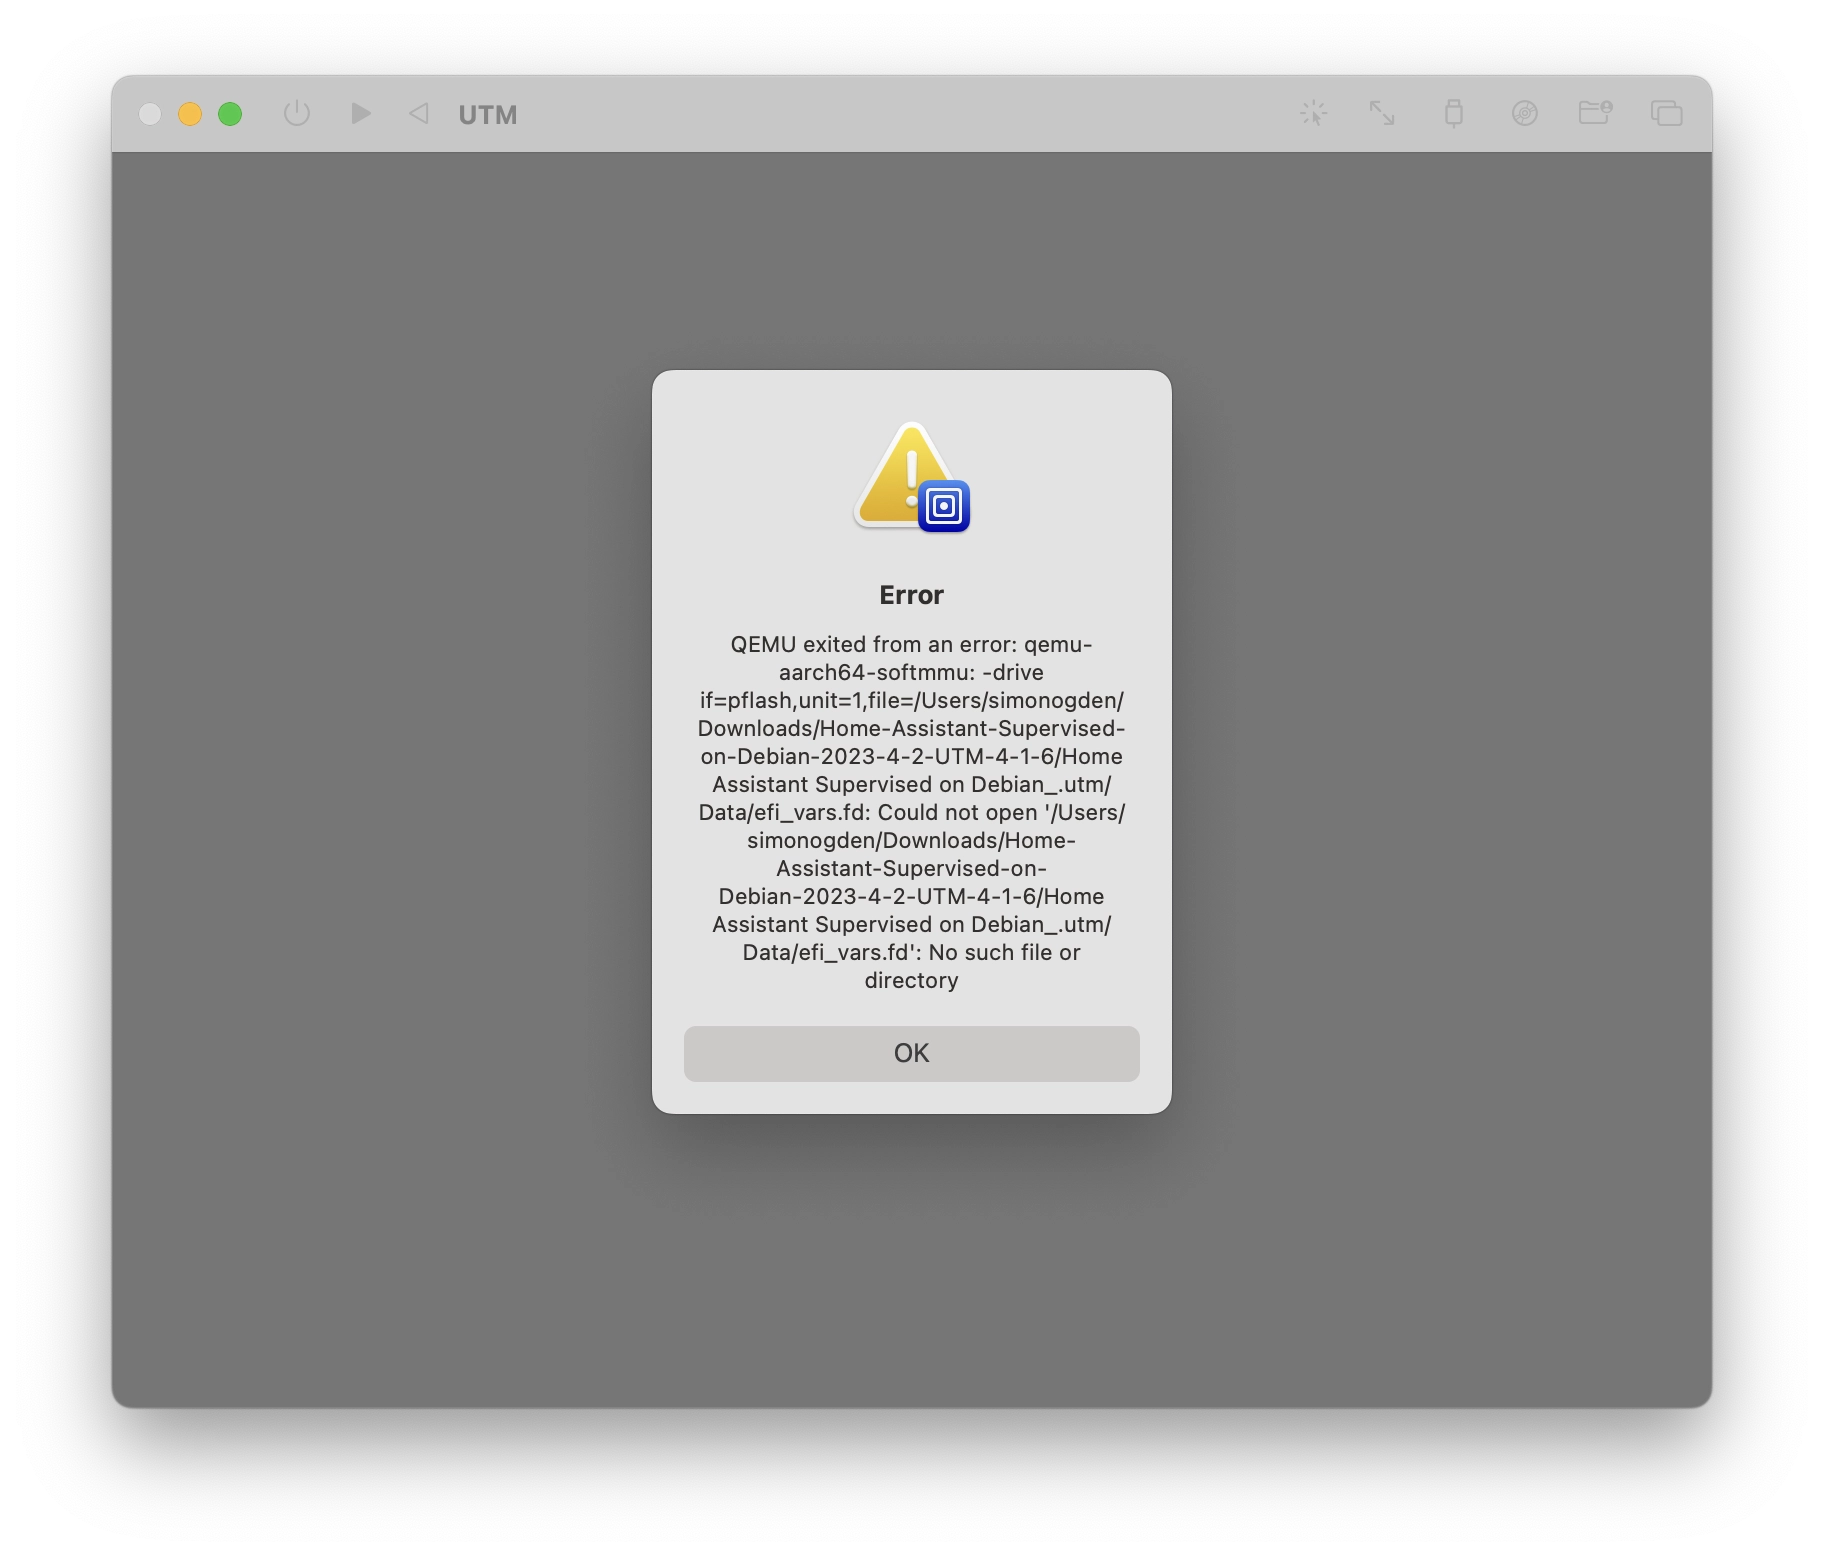
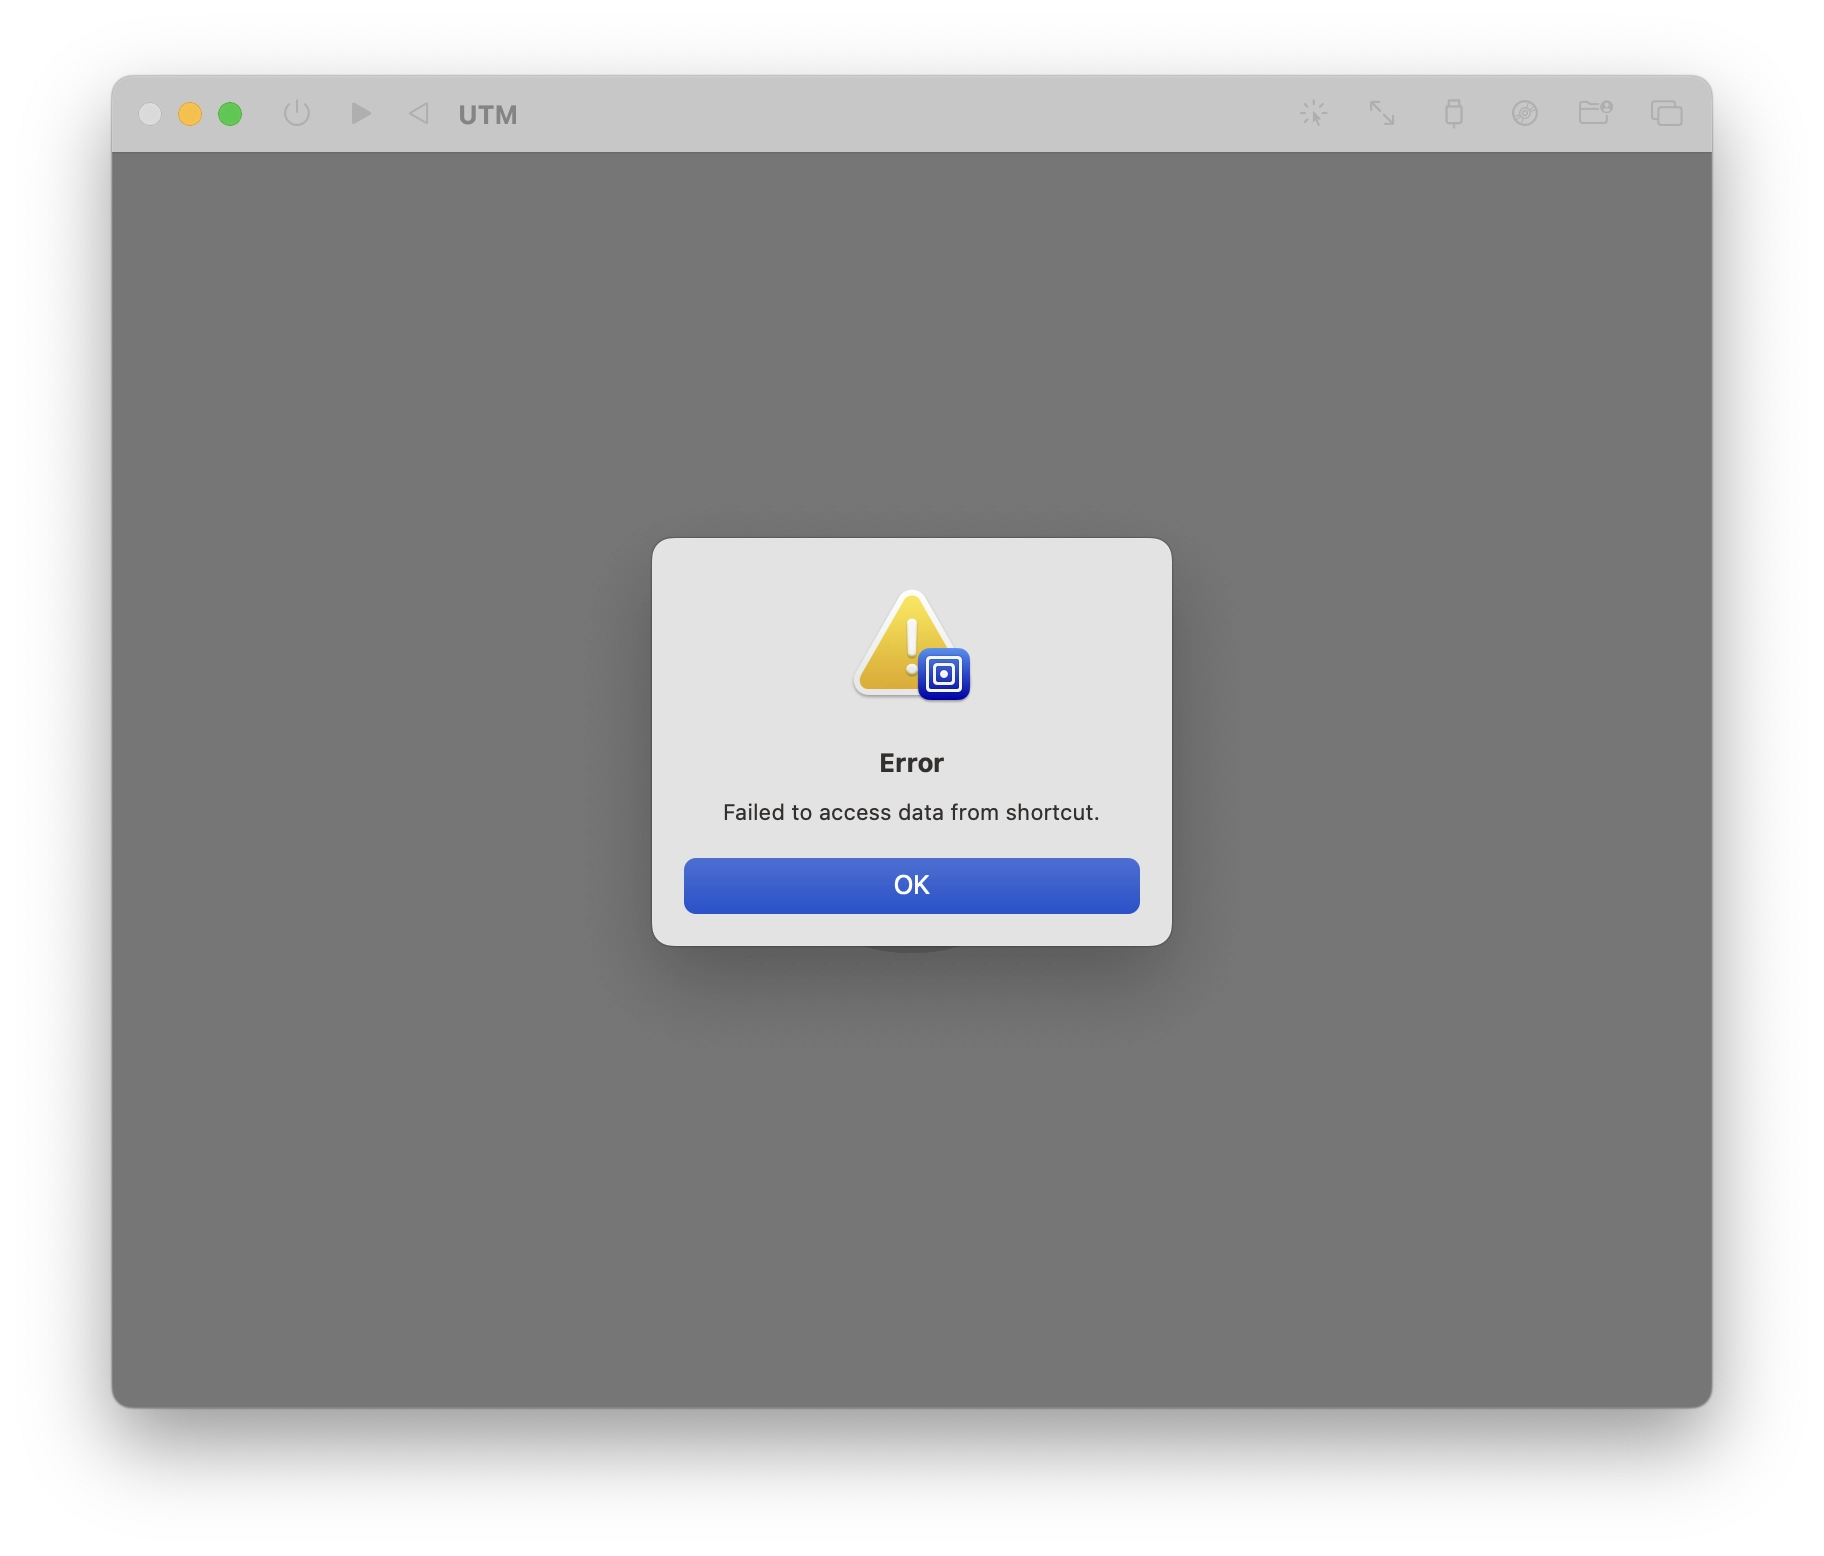
The most common error messages that you might get when trying to run the Home Assistant image in UTM are no such file or directory, or failed to access data from shortcut.
UTM can be a little bit fussy about the file location. If you move the .utm file after using it then you may get an error. You may also experience these errors if you already have UTM installed.
In order to fix these errors, take the following steps:
- Confirm that you are running the correct UTM image on your Mac (Apple Silicon or Intel Mac). If you have the wrong version, go to the downloads area and download the correct version.
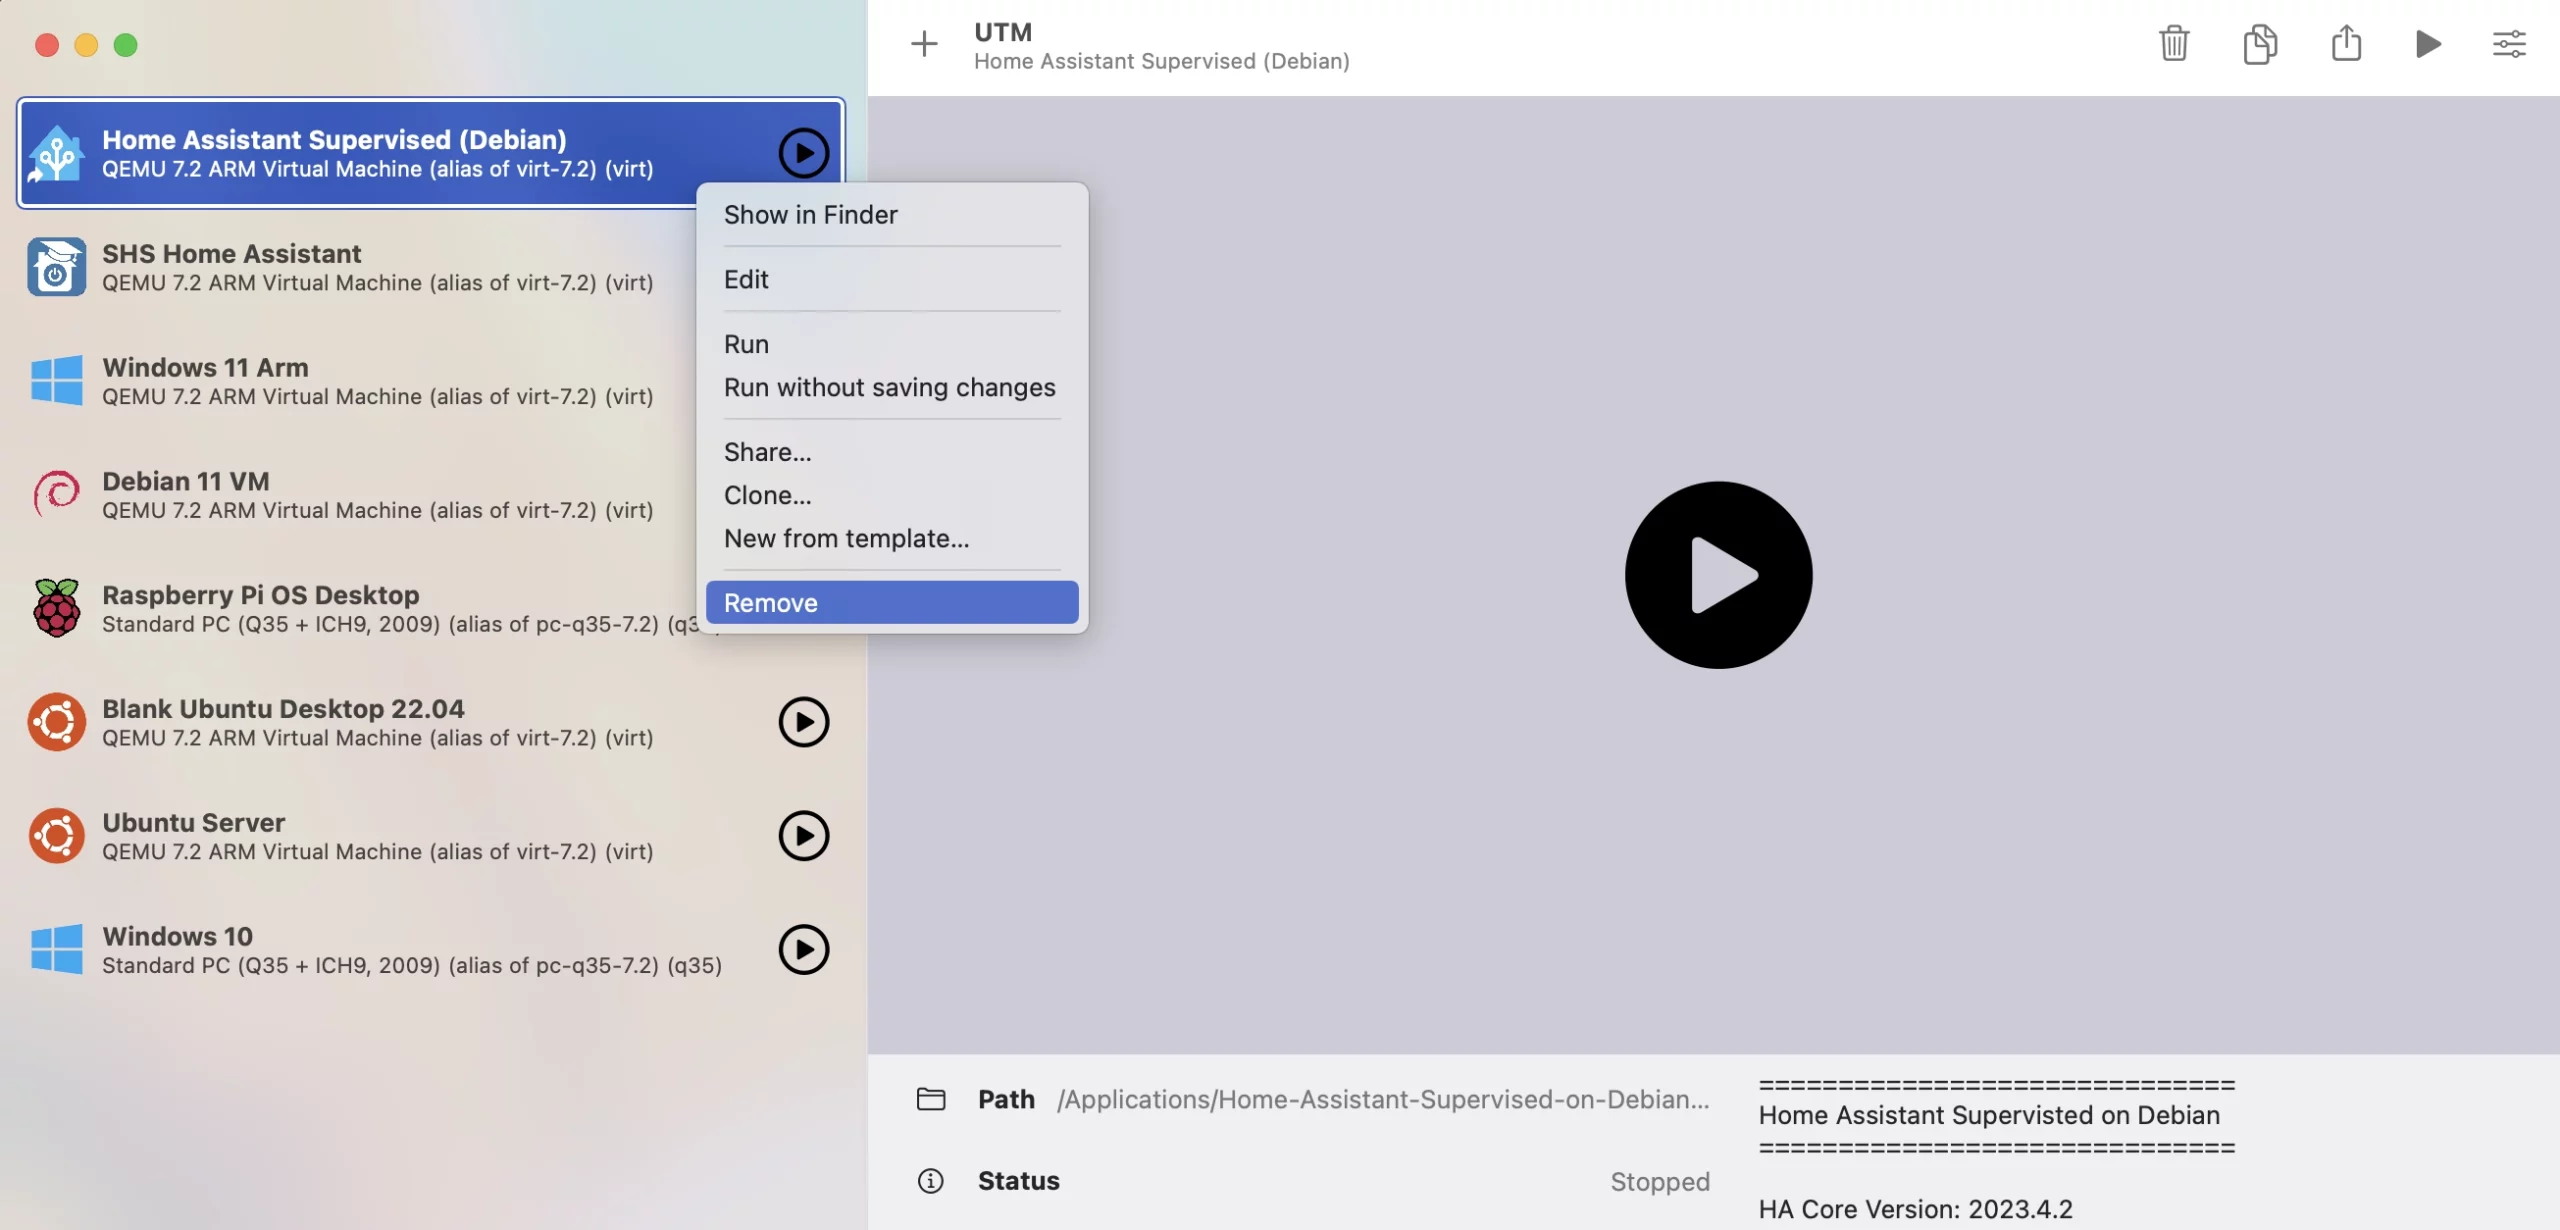
- Open UTM, right click the Home Assistant Image in the left-hand menu and then click remove.
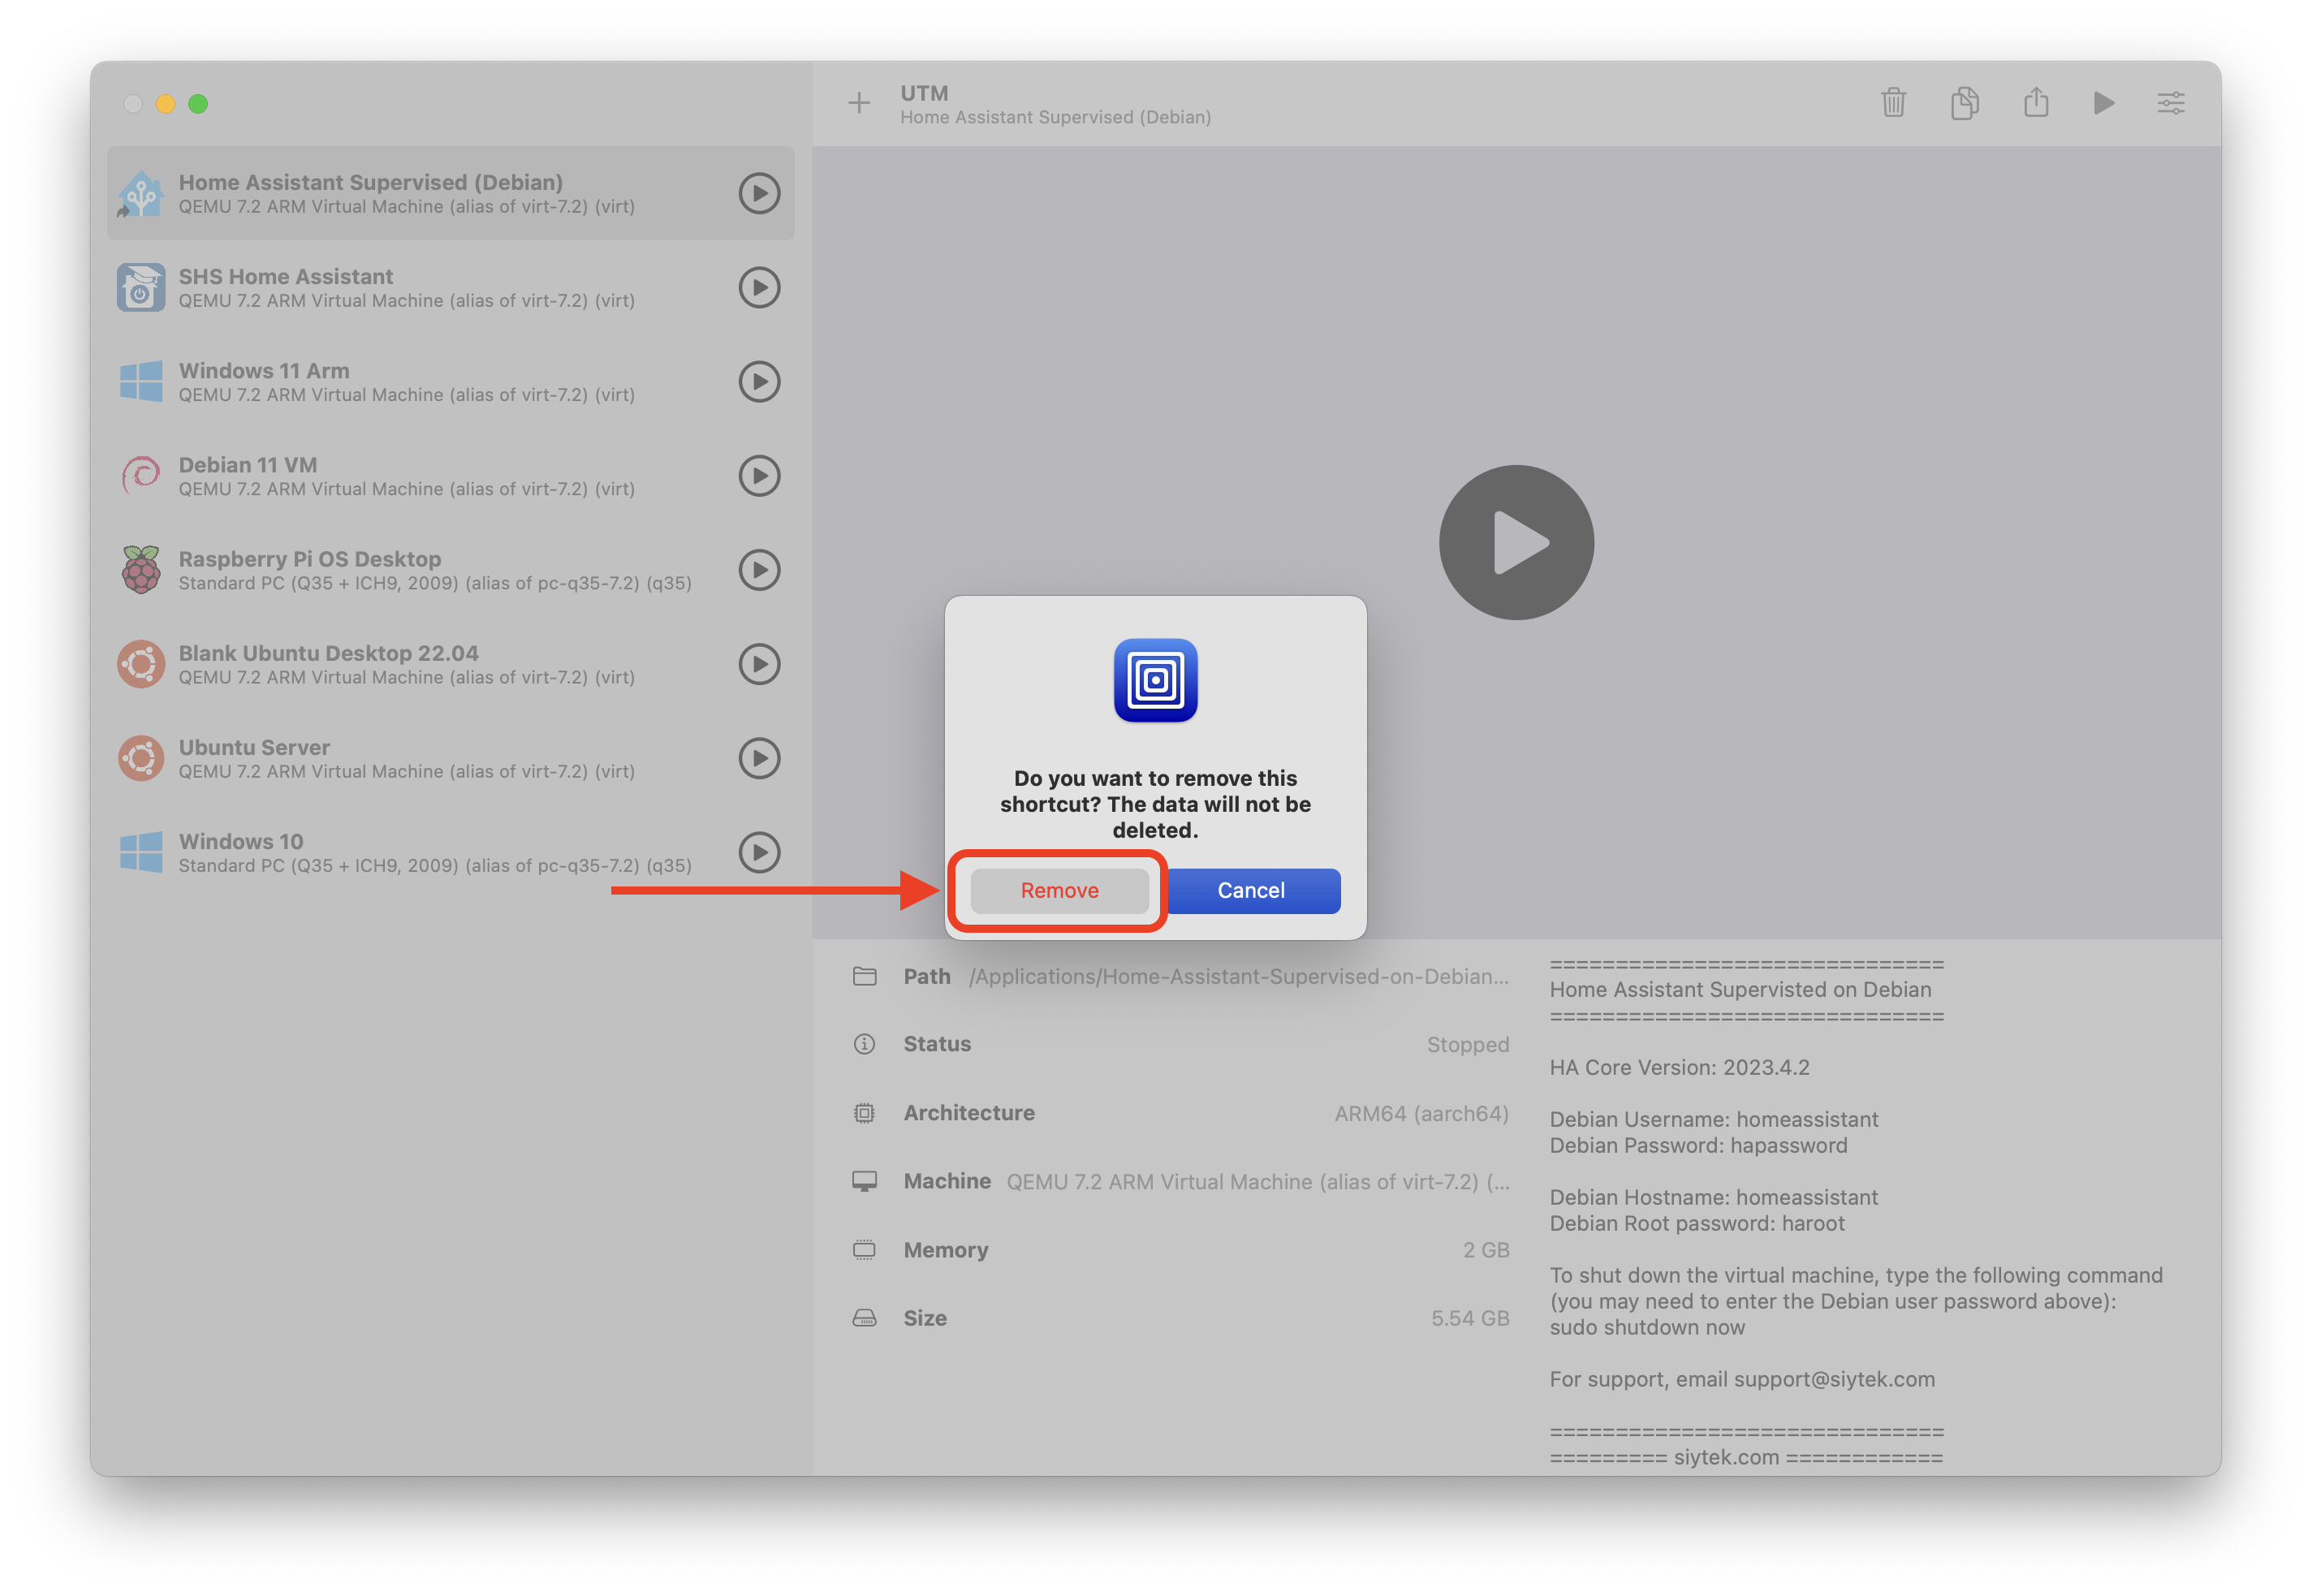
- Confirm that you would like to remove the image.
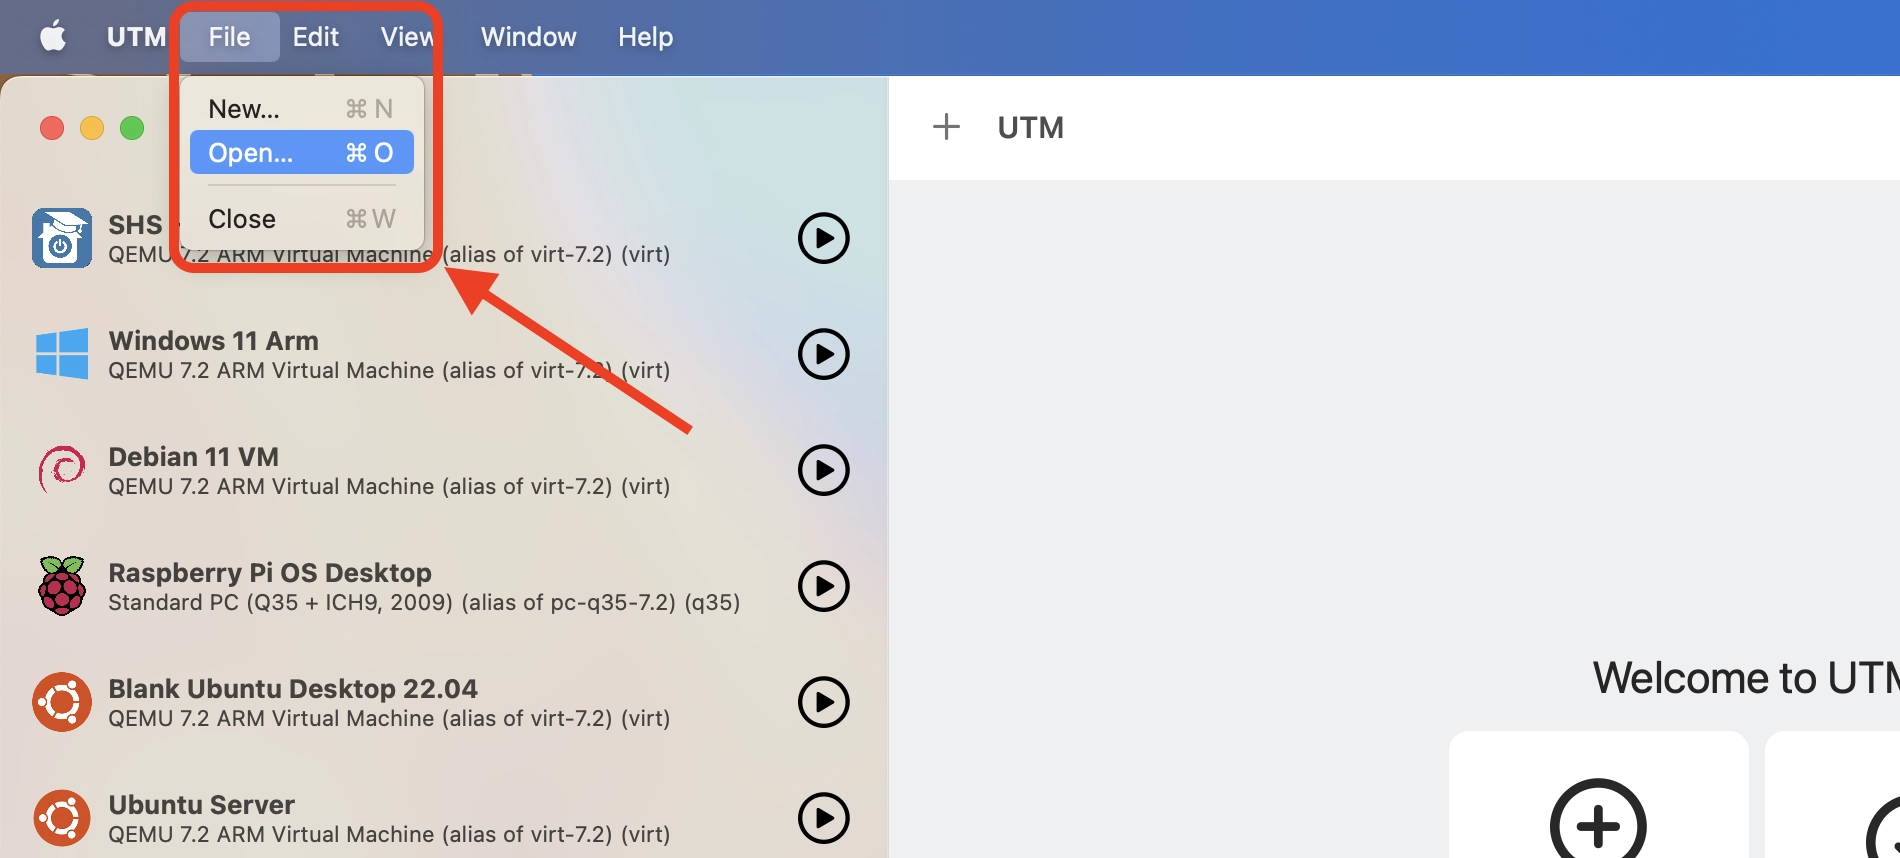
- Close UTM and then reopen UTM.
- Click file > open and locate the Home Assistant image
.utmfile on your Mac.
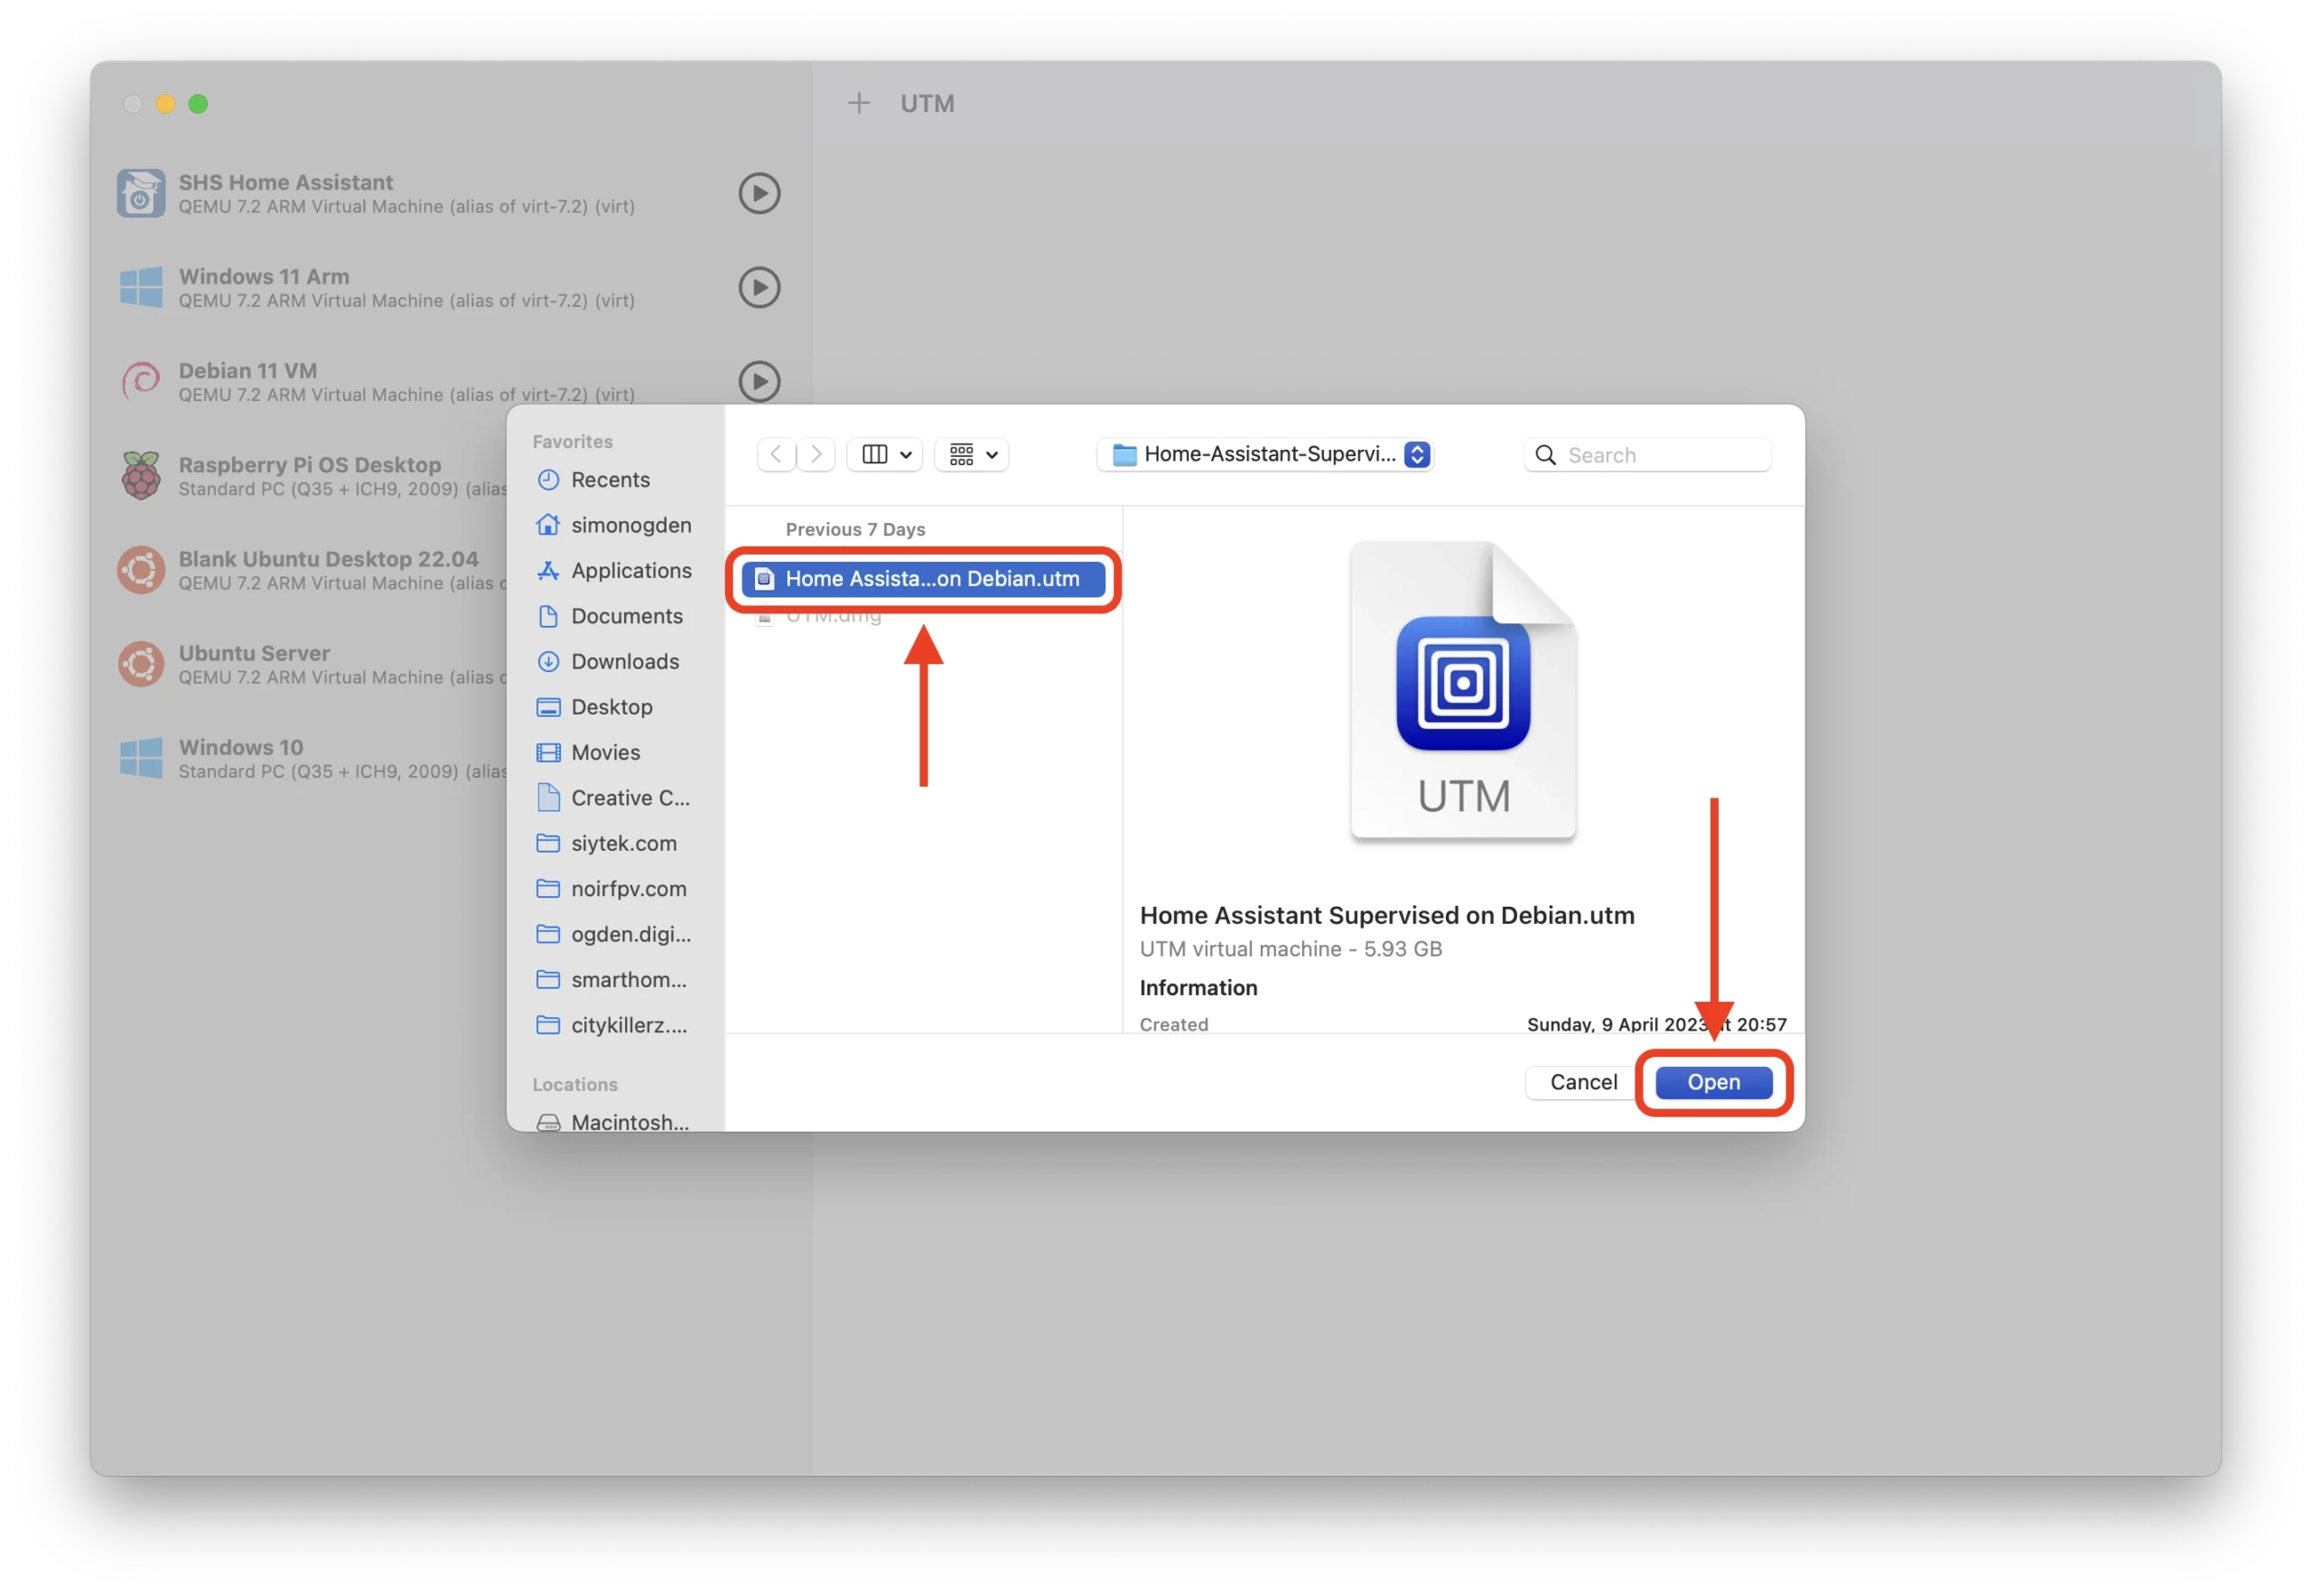
- Select the Home Assistant
.utmimage and then click open to add it to UTM.
- Try running the Home Assistant again. This will hopefully have rectified any issues UTM had with the file location.
If you are still having difficulties, please don’t hesitate to contact our support team contact our support team. Please attach any screenshots showing your problem, including any error messages.
Unzipping the Download Produced a “__MACOSX” Folder and I am Getting A No Such File or Directory Error
If you get an error relating to a file that cannot be found (likely to be efi_vars.fd) when trying to start the virtual machine and unzipping the download has produced a “__MACOSX” folder, the unarchiving may have failed due to a bug that affects certain versions of Mac OS Ventura.
With the affected versions of Mac OS Ventura, using the built-in extract function does not extract the files correctly.
This problem can be identified when a “__MACOSX” folder is produced after unzipping the download. This is a temporary folder that should be automatically removed after the files have been unzipped and the end user should never see it.
This leads to the .utm file being unzipped incorrectly, missing out one of the key files necessary to launch the virtual machine.
The quickest workaround to this problem is simply to download a free third party unzipping tool to extract the files from the downloaded .zip file, rather than using the built-in extractor. You can download The Unarchiver for free here.
For a longer term solution, ensure that your Mac OS Ventura is fully up to date in order to ensure that the built-in extractor is working correctly.
This Site Can’t Provide a Secure Connection Error
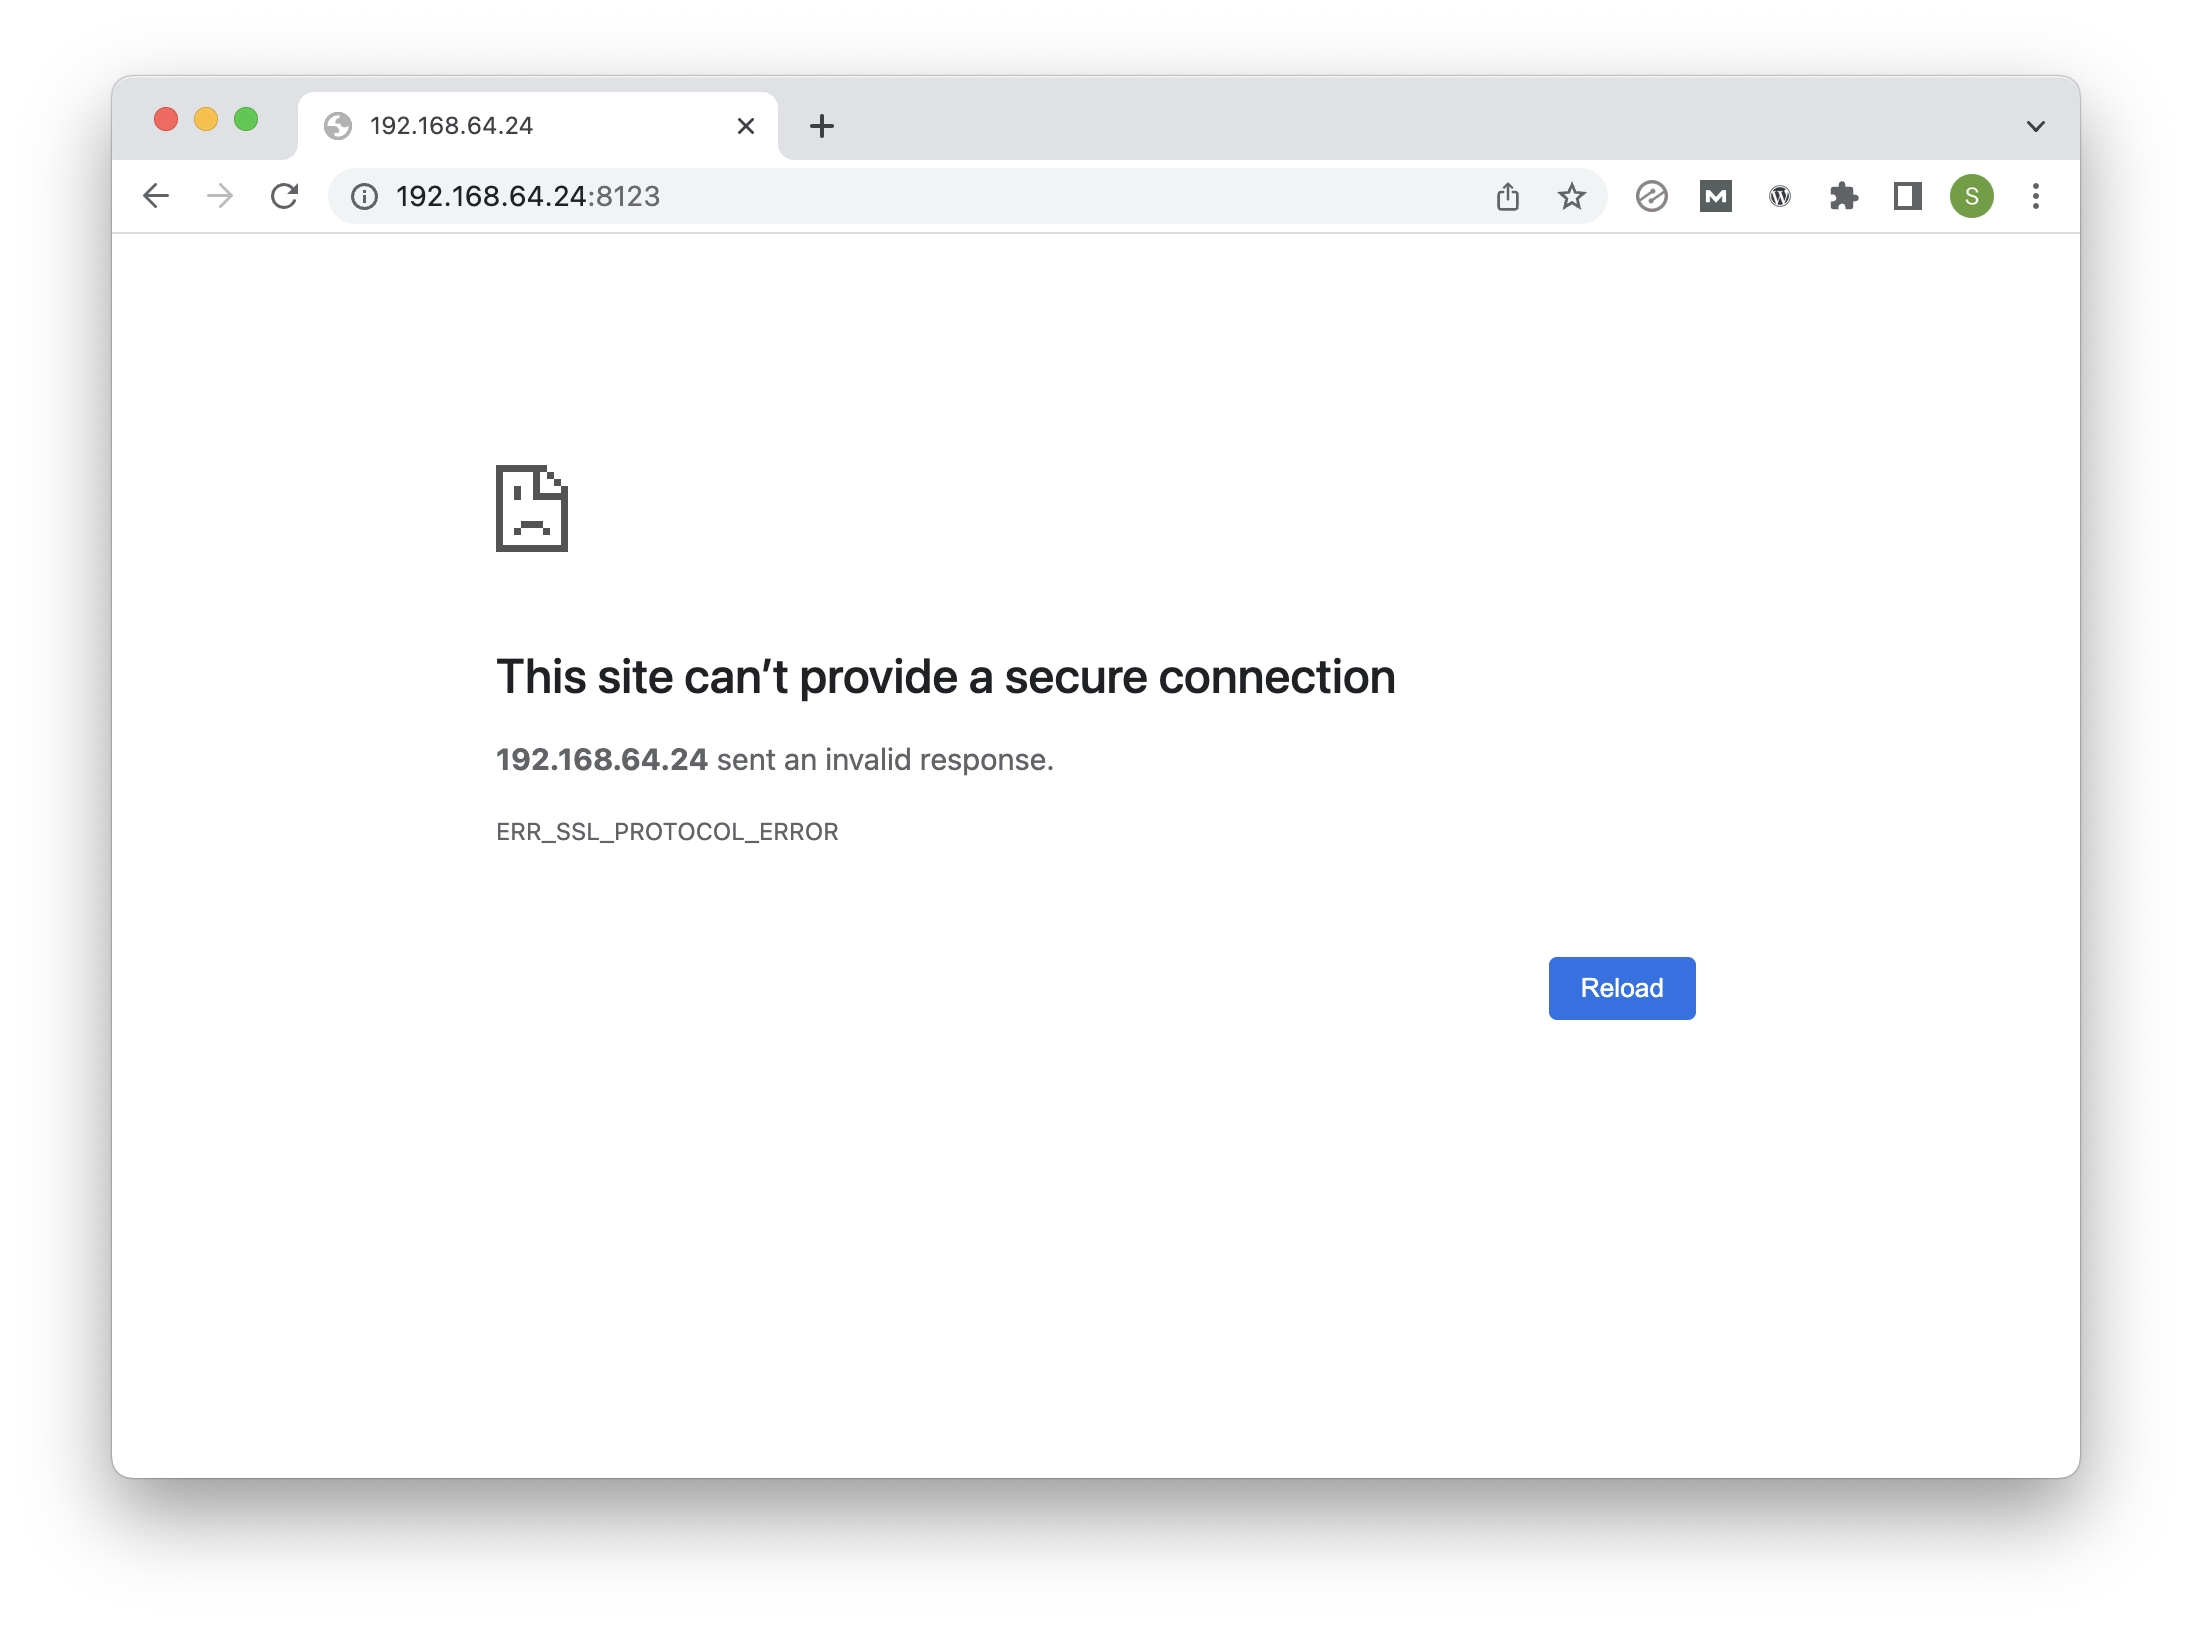
If you receive an error related to SSL, such as the ERR_SSL_PROTOCOL_ERROR shown below, it is likely because you are trying to connect with HTTPS instead of using HTTP
Home Assistant does not support SSL out of the box, however it can be added after the onboarding process. See this tutorial for more information.
In order to fix this error, you must specify HTTP when entering the IP address into the browser:
http://<my-ip-address>:8123
Make sure that you are entering the IP address in the format exactly as shown above, replacing <my-ip-address> with the IP address given when the virtual machine boots up.
Home Assistant won’t Detect My Devices
This is most likely due to the network mode that UTM is running in. By default UTM uses something called shared network mode, which generally works great to get Home Assistant up and running, but has some limitations when you want to connect external devices.
The most likely solution to this problem is to switch UTM into a different network mode called bridged network mode. This should give Debian/Home Assistant it’s own IP address on your network and allow other devices to be detected.
In order to change the network mode, follow this procedure for switching the UTM network mode.
Unable to Connect to Home Assistant using the Mobile App or a Browser on a Different Computer
By default the UTM virtual machine uses a method of networking called shared network, as it is most likely to work on different systems out of the box.
With this method of networking a virtual network is established between the host Mac OS operating system and the guest Debian operating system.
The host operating system (Mac OS) manages the external network connection for both itself and the Debian guest operating system (running Home Assistant).
However when operating in this mode it is not possible to connect to Home Assistant with external devices, such as the mobile app running on your mobile phone, even if it is connected to the same WiFi router.
This is because by default, devices on the external network (your local area network) cannot see the virtual network between your host and guest operating system.
Bridged Network Mode does Not Give me an IP Address When Using a Wired Network (Ethernet) Connection
If you are using a wired network connection (Ethernet) to connect your Mac to your local area network and you want to use bridged network mode, you will need to complete an extra step.
Simply follow this procedure to set the bridged network so that it uses your Ethernet connection.
Switching the UTM Network Mode
By default the VM is configured to use a network mode called “shared network” as it offers the most compatibility out of the box. This mode creates a virtual network between the guest OS (Debian) and the host OS (Mac OS) and provides the guest OS with access to the internet.
One disadvantage to this method of networking is it does not allow devices on your local network outside of the host OS to access the guest OS, which means you can only access Home Assistant from the browser on your host OS.
The following diagram can help you better understand the difference between the network modes:
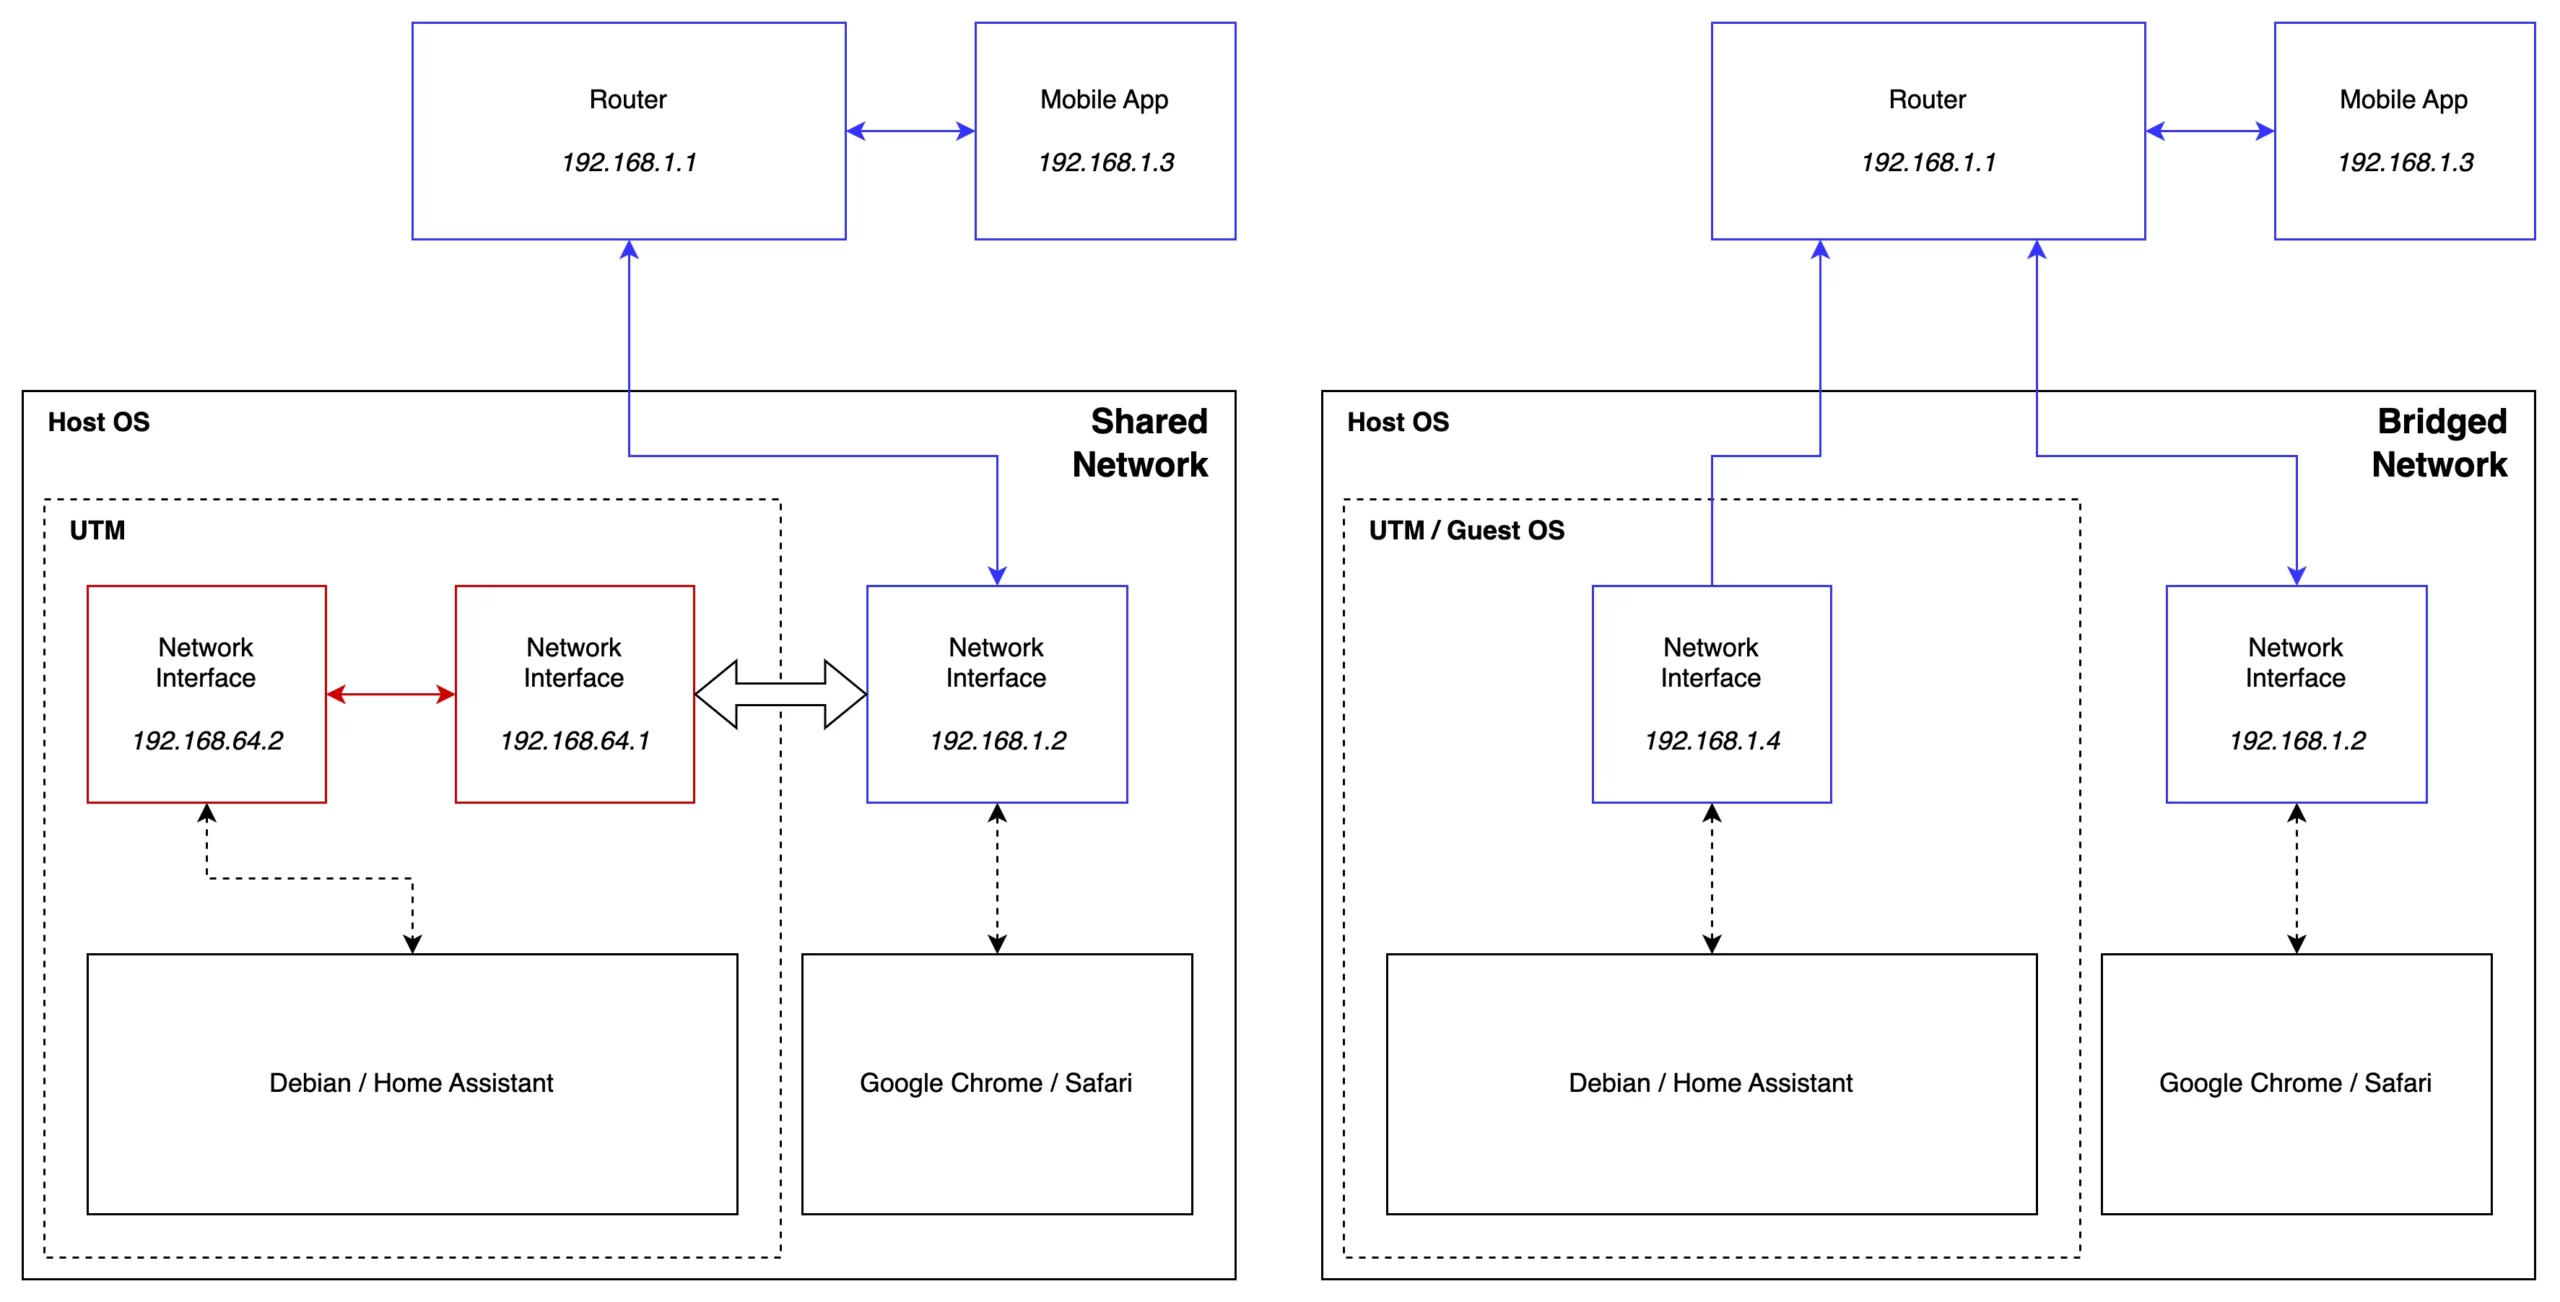
In order to access Home Assistant from other devices on your local network (the mobile app, other computers on the network or IP-based smart devices), the Debian guest operating system should have it’s own IP address on your external network that is in the same subnet, for example 192.168.1.X.
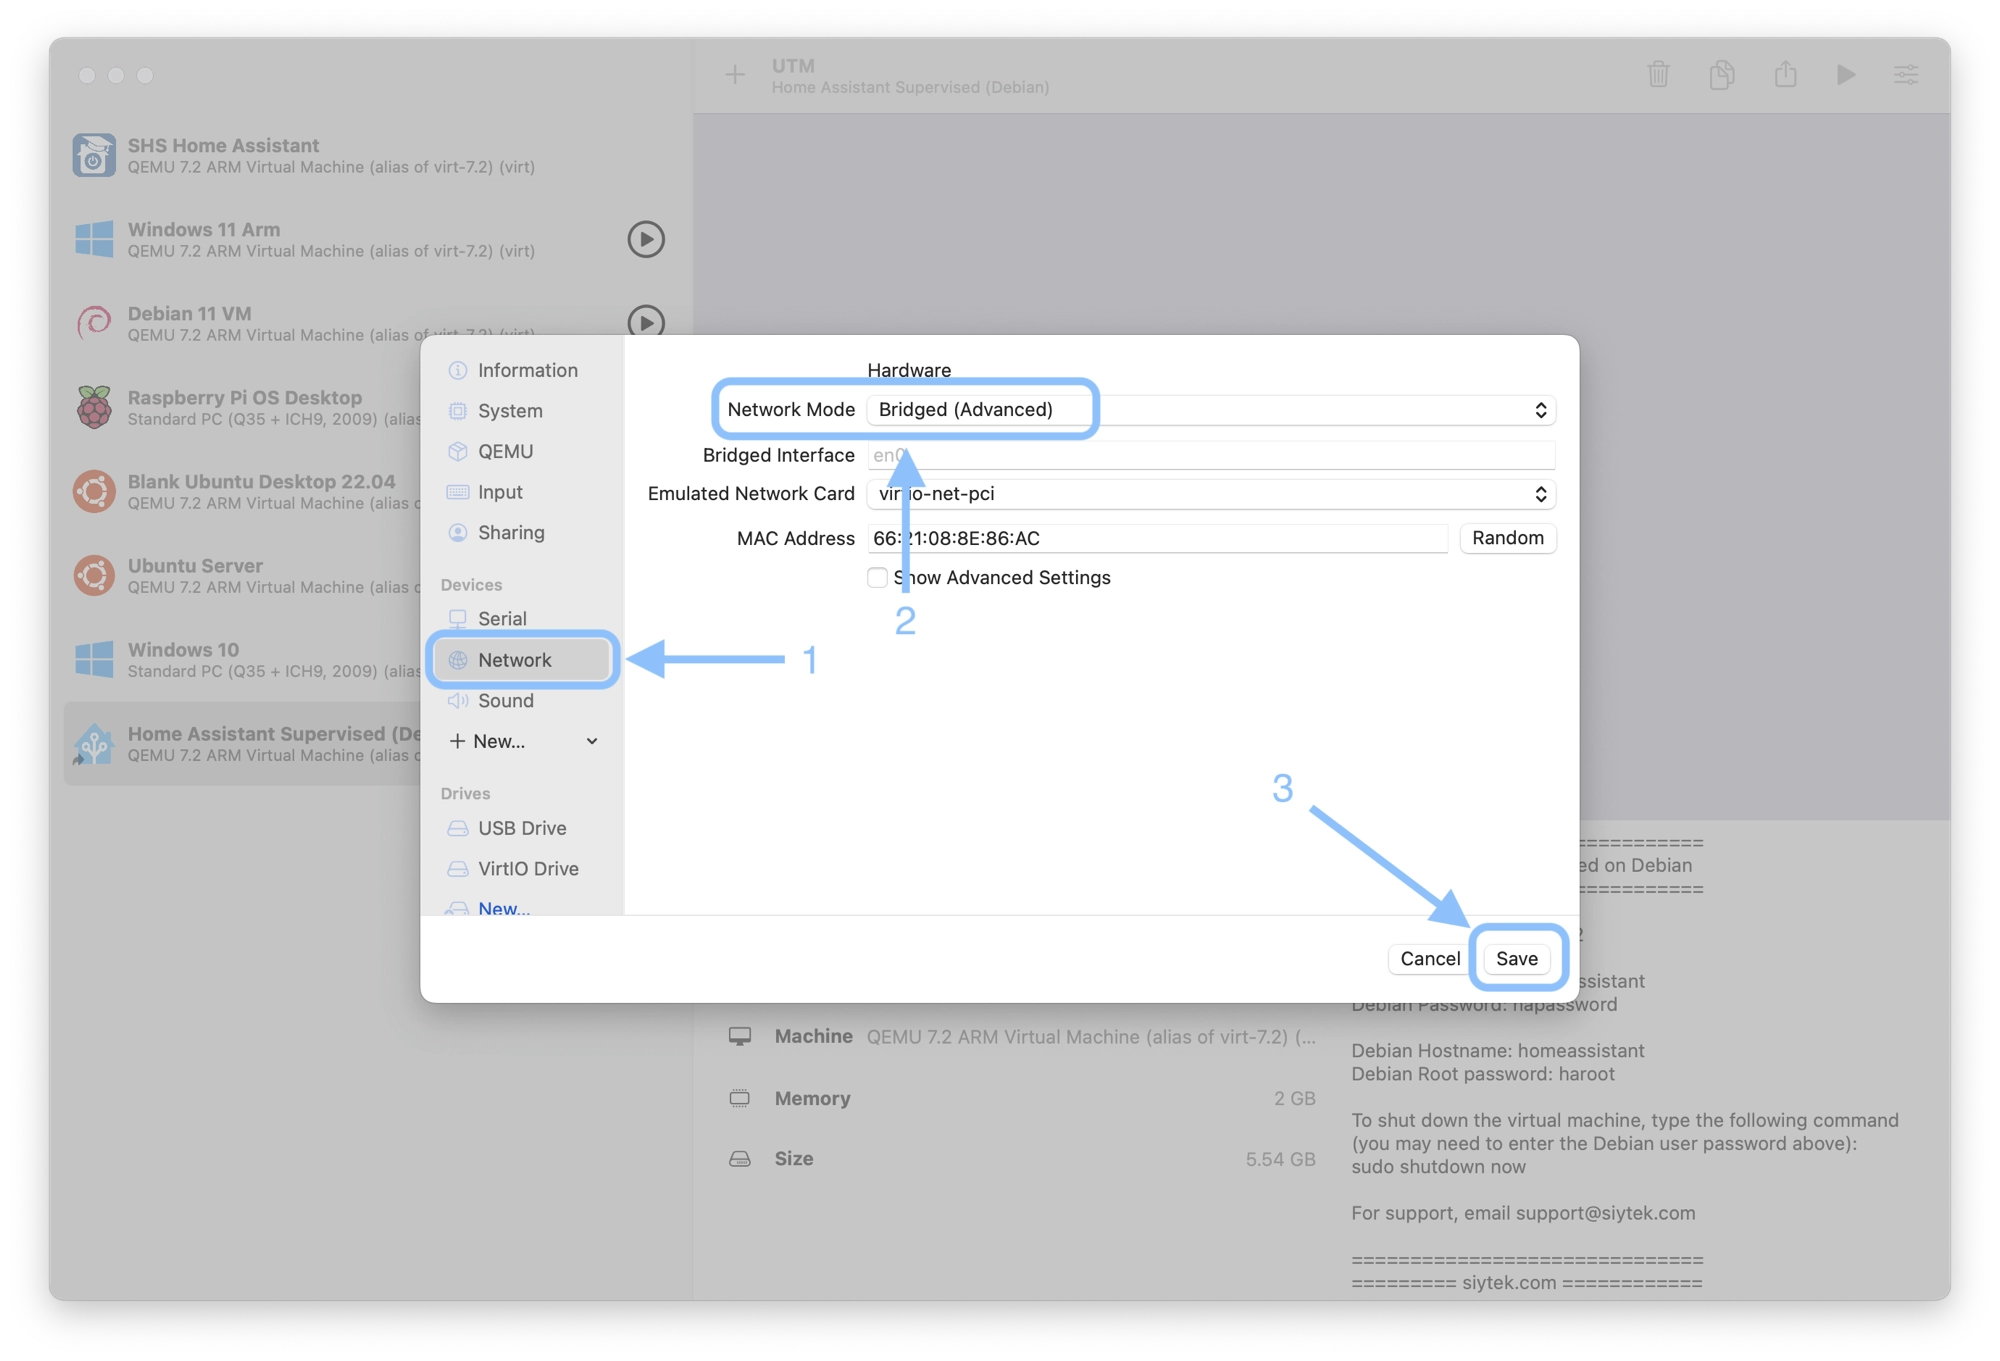
This can be achieved by changing the networking mode. You can change the network mode with the following steps:
- Shut down the Home Assistant Debian virtual machine if it is currently running.
- Right click the Home Assistant Debian virtual machine on the left-hand sidebar and click edit.
- Under Devices, click Network to show the network settings.
- In the Network Mode drop down list, change the setting to Bridged (Advanced) and then click Save.
- Start the Home Assistant Debian virtual machine.
When you boot the virtual machine with the new network settings, the IP address assigned should now match your local area network and you should be able to connect from external devices, such as other computers or the mobile app.
Bridged network mode and Ethernet
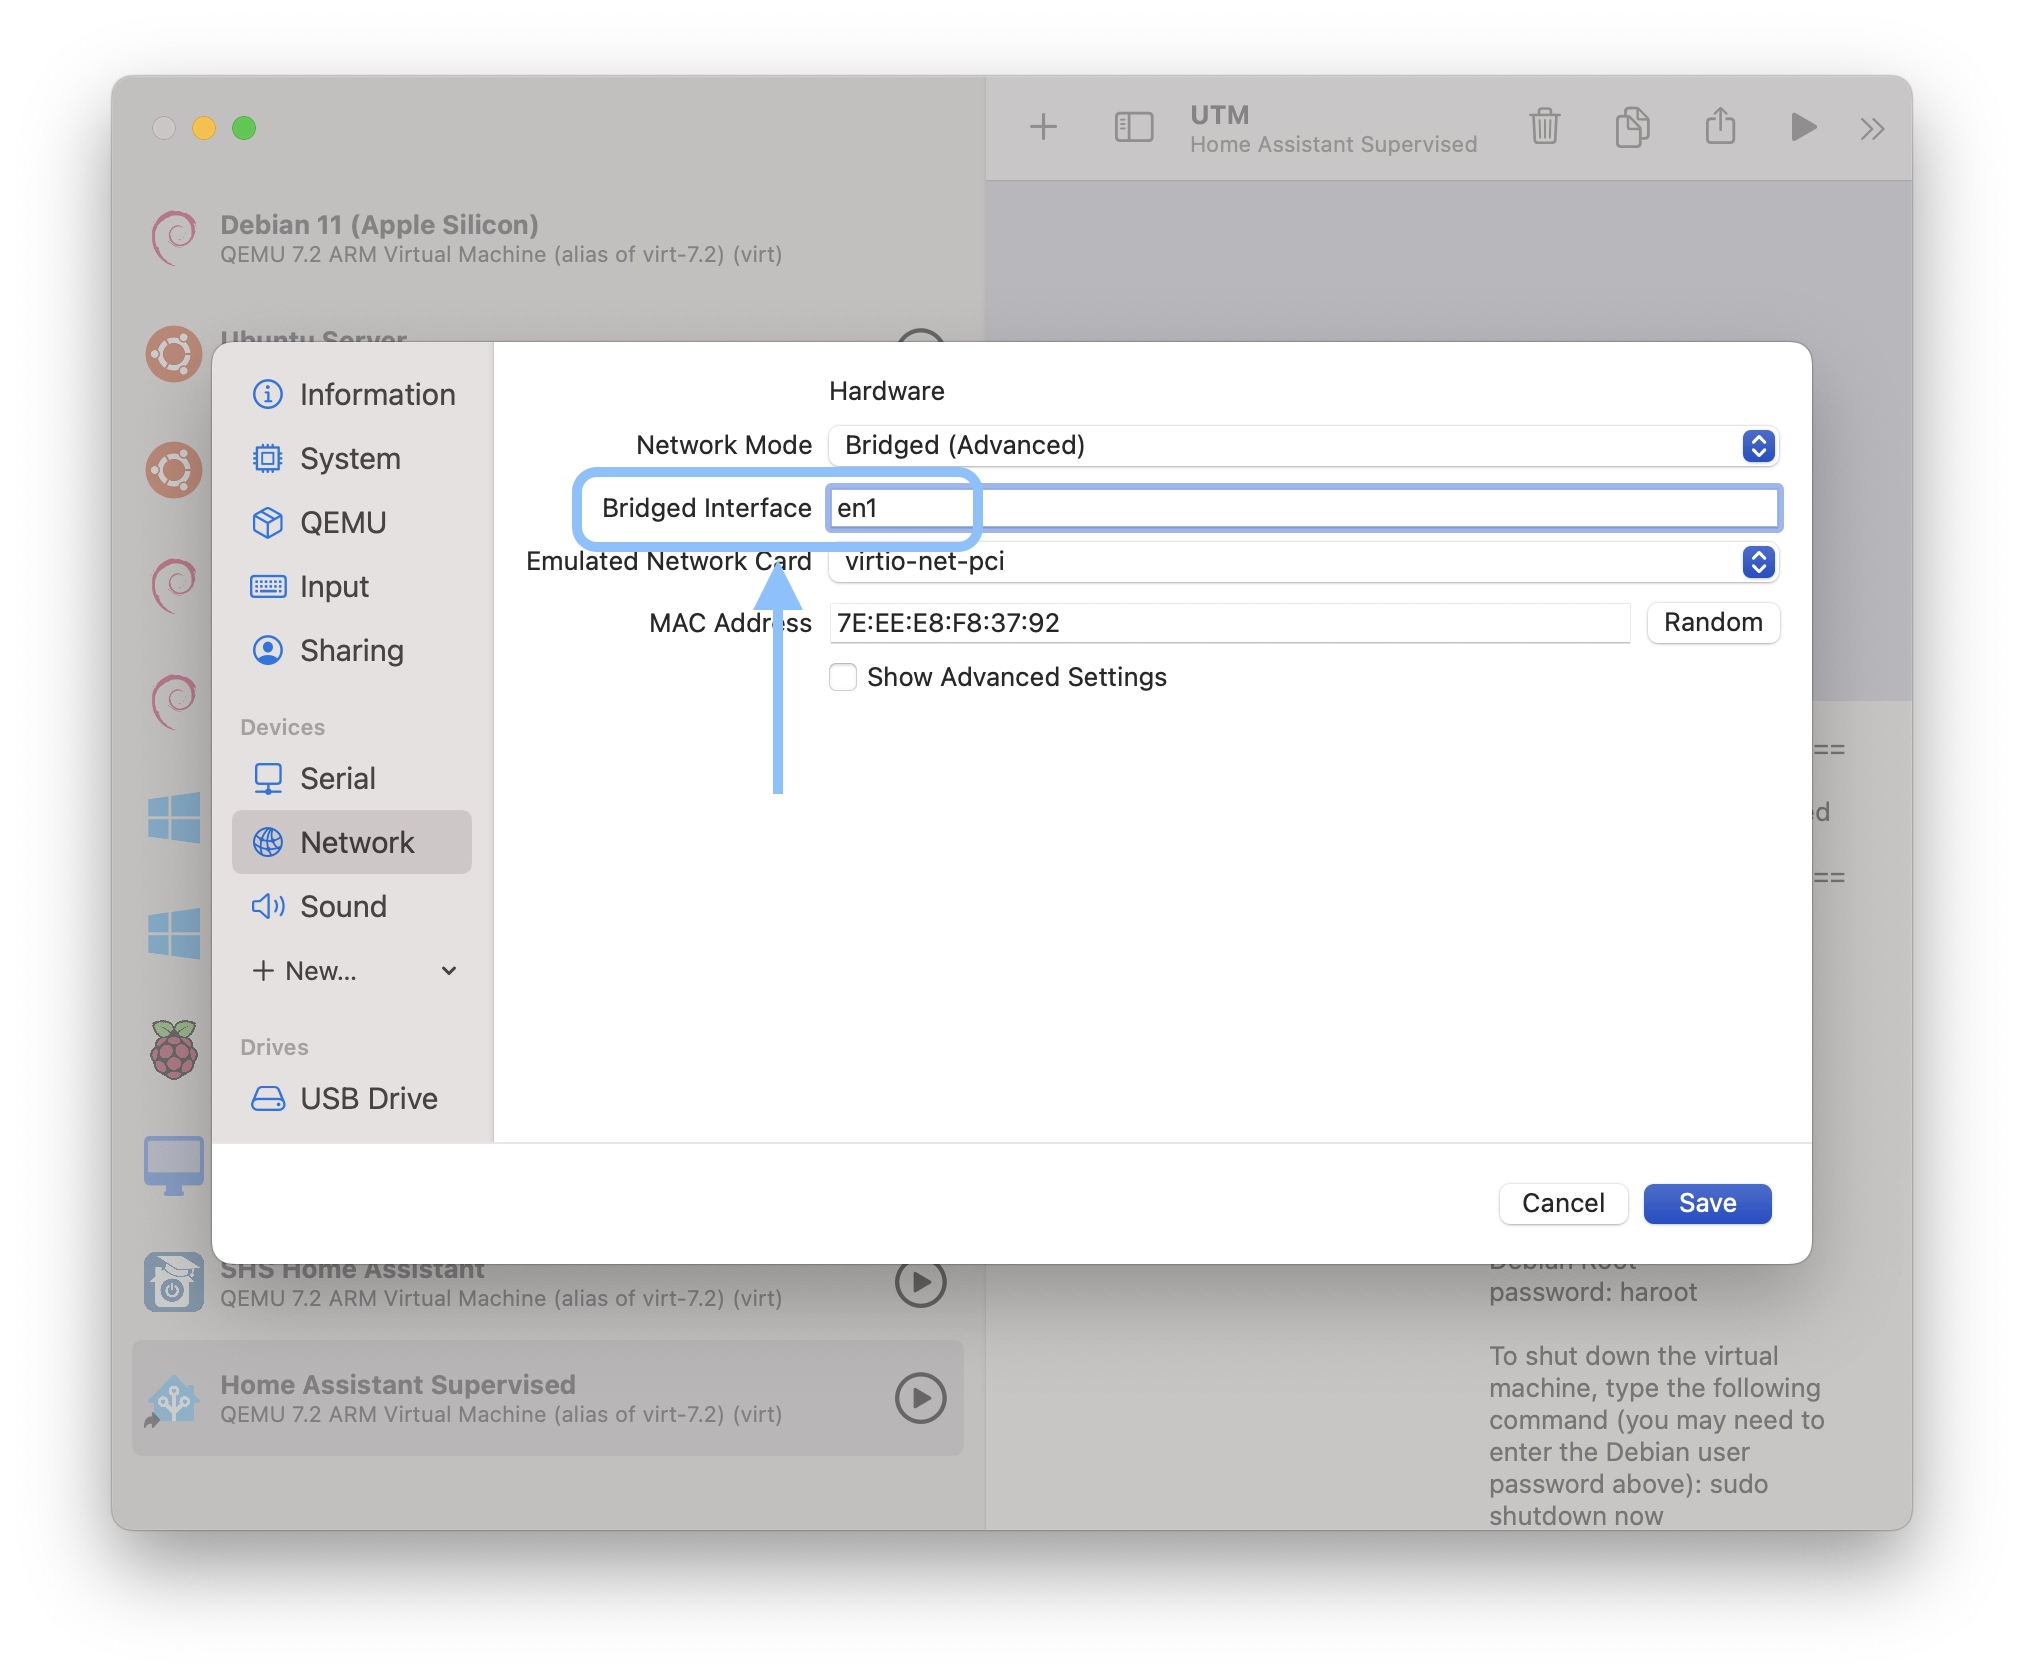
If you want to switch to bridged networking mode and use Ethernet, you will need to complete an additional step. By default UTM will create a network bridge to your WiFi adapter
If you have both WiFi and wired network connections (Ethernet) on your Mac and you want to use Ethernet, you will need to manually change the network bridge so that it uses Ethernet.
In mostly all cases the WiFi interface is called en0 and the Ethernet is called en1.
To connect the network bridge to ethernet, simply enter en1 as the value for Bridged Interface on the Network settings menu.